d3.jsのフォース(force)を理解するための簡単な例5:オブジェクトが跳ねる効果再現できるd3.forceLink
やりたいこと:オブジェクトが弾む効果の作成
- d3.forceLinkを使用します(d3.js v4)
- オブジェクト(例:玉)をドラッグして移動、ドロップしたら、決まった場所に弾むような効果

実現構想:d3.forceLinkのバネ効果を利用します
- 前回紹介した「d3.jsのフォース(force)を理解するための簡単な例4:バネのような伸縮効果再現できるd3.forceLink」 コードの元にします
- 決まった場所(例:四角内)にオブジェクト(例:玉)が弾む
- オブジェクトをドラッグして移動します
- オブジェクトをドロップしたら、オブジェクトが四角範囲内に弾みます
- 説明するため、簡単の二つのオブジェクトのデータセット、リンクセットをします
// オブジェクト:aaa、bbb
data_set = [ {name:"aaa",fx:400,fy:200},  // fx/fyで配置場所に固定
             {name:"bbb"} ]  ;

// オブジェクト:aaa、bbb の繋ぎリンクセット
link_set = [ {source:"aaa", target:"bbb"} ];
ポイント1:d3.forceLinkにつなぐ一つノード(node)を固定します
- d3.forceLinkでつなぐオブジェクトがノード(node)と言います
- 一つノードにfx、fy、index、vx、vy、x、y要素があります
- fx/fyはノードを固定する座標を定義します
- nullの場合は固定しない
- 初期値:null
- 今回の例では最初にオブジェクト(aaa)をx:400,y:200に固定します
- もう一つオブジェクト(bbb)をaaaに重ねって表示させます
var line_force = d3.forceSimulation()
  .nodes(data_set)
  .on("tick", ticked)
  .force("link", d3.forceLink(link_set)
  		.id(function(d){ return d.name ; })
                 .distance(0)  // 重ねる表示のため、リンクの距離はゼロにする
                 .strength(0.5))
  .force('charge', d3.forceManyBody().strength(0.8))
  .force("collision", d3.forceCollide(0))  // 重ねる表示のため、両オブジェクトの衝突距離はゼロにする
  ;
ポイント2:関数(datum())で固定しているオブジェクト(bbb)を決まった場所(四角)に再固定します
- オブジェクト(aaa)をドロップ時、オブジェクト(bbb)を決まった範囲(四角)に再固定すれば、オブジェクト(aaa)がd3.forceLinkの力で決まった範囲(四角)に弾むことになります
- オブジェクト(bbb)ノードにバインディングされたデータをアクセスするため、d3.select.datum()の出番です
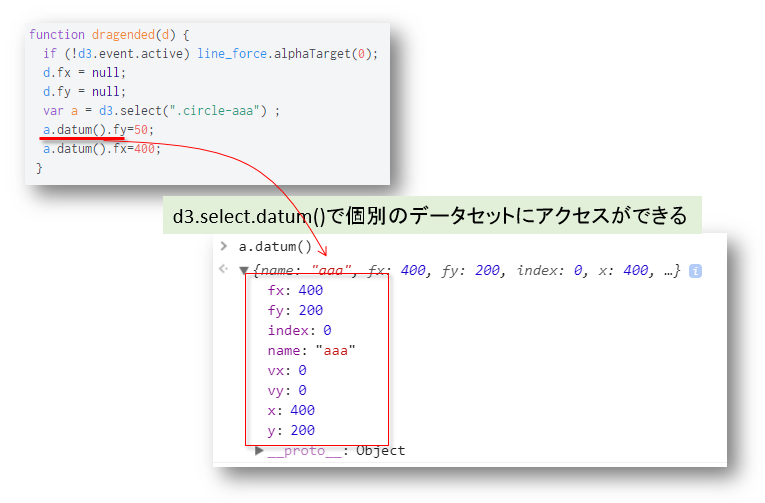
// オブジェクト(aaa)をドロップ時の処理 function dragended(d) { if (!d3.event.active) line_force.alphaTarget(0); d.fx = null; d.fy = null; var a = d3.select(".circle-aaa") ; // オブジェクト(bbb)を取得 a.datum().fy=50; // 決まった範囲にxを再固定 a.datum().fx=400; // 決まった範囲にy再固定 } - プログラム全体は以下ようです
data_set = [ {name:"aaa",fx:400,fy:200},
                   {name:"bbb"} ]  ;
link_set = [
	{source:"aaa", target:"bbb"},
];

var width=600, height=300;

d3.select("#content")
  .append("rect")
  .attr("x",380)
  .attr("y",30)
  .attr("width", 40)
  .attr("height",40)
  .attr('fill', 'rgba(0,0,0,0)')
  .attr('stroke', 'red')
  ;

var force_g = d3.select("#content").append("g") ;

var links =  force_g.selectAll(".link")
  .data(link_set)
  .enter()
  .append("line")
  .attr("class", "link")
  .attr("stroke", "none")
  .attr("stroke-weight", 1)
  ;

var circles =  force_g.selectAll("circle")
  .data(data_set)
  .enter()
  .append("circle")
  .attr("class",function(d){ return "circle-"+d.name })
  .attr("r", 15)
  .attr("fill","lightblue")
  .call(d3.drag()
          .on("start", dragstarted)
          .on("drag", dragged)
          .on("end", dragended)
          )
  ;

var line_force = d3.forceSimulation()
  .nodes(data_set)
  .on("tick", ticked)
  .force("link", d3.forceLink(link_set)
  		  .id(function(d){ return d.name ; })
                  .distance(0)
                  .strength(0.5))
  .force('charge', d3.forceManyBody().strength(0.8))
  .force("collision", d3.forceCollide(0))
  ;

function dragstarted(d) {
  if (!d3.event.active) line_force.alphaTarget(0.9).restart();
  d.fx = d.x;
  d.fy = d.y;
}

function dragged(d) {
  d.fx = d3.event.x;
  d.fy = d3.event.y;
}

function dragended(d) {
  if (!d3.event.active) line_force.alphaTarget(0);
  d.fx = null;
  d.fy = null;
  var a = d3.select(".circle-aaa") ;
  a.datum().fy=50;
  a.datum().fx=400;
 }

function ticked(){
	circles
  	.attr("cx", function(d){ return d.x; })
    .attr("cy", function(d){ return d.y; }) ;

  links
  .attr("x1", function(d) {   return d.source.x; })
  .attr("y1", function(d) {	return d.source.y; })
  .attr("x2", function(d) {	return d.target.x; })
  .attr("y2", function(d) {	return d.target.y; })
  ;
}
d3.forceLinkがオブジェクト要素間のバネの伸縮効果の再現
- d3.forceにある一つ重要な要素d3.forceLinkよりバネの伸縮効果を生み出すことができます
- 特にドラッグ/ドロップ併合に使用すると、よりバネの伸縮効果の体験はできます
- d3.forceLinkはsvgのlineエレメントでLinkを描画します
- d3.forceSimulationのtickイベントより、動的にオブジェクト間の距離を計算しながら、lineを描画します
- d3.forceLinkのバネ効果の強さはcollision/charge/centerなどの要素の設定より調整されます
作成要点1:オブジェクト要素のリンク元(source)ターゲット先(target)設定
- 描画のオブジェクトデータセットを定義します
- オブジェクト間にリンクをつけるターゲット先にのデータセットを定義します
// 描画するオブジェクトのデータセット data_set = [{name:"aaa"}, {name:"bbb"}, {name:"ccc"}, {name:"ddd"}, {name:"eee"}, {name:"fff"} ] ; // オブジェクト間のリンク元とリンク先定義 link_set = [ {source:"aaa", target:"bbb"}, {source:"bbb", target:"ccc"}, {source:"ccc", target:"ddd"}, {source:"ddd", target:"eee"}, {source:"eee", target:"fff"}, {source:"fff", target:"aaa"}, ];- リンク元: sourceで定義
- リンク先: target で定義
- 「source」、「target」は決まりキーワード、変えることはできません
作成要点2:d3.forceSimulationでd3.forceLinkを定義
- d3.forceSimulationでforceのオブジェクト描画定義時にd3.forceLinkを定義します
var line_force = d3.forceSimulation() .nodes( data_set ) // オブジェクトのデータセット .on("tick", ticked) .force("link", d3.forceLink(link_set) // リンク元とリンク先のデータセット .id(function(d){ return d.name ; }) // オブジェクトデータセットにあるリンク要素フィールド設定 .distance(20) ) .force("center", d3.forceCenter(width/2, height/2)) .force('charge', d3.forceManyBody().strength(15)) .force("collision", d3.forceCollide(15)) // オブジェクトのぶつけ合い距離 ;- d3.forceLink().id()でのidがリンク元/先にのデータフィールド名を定義
作成要点3:d3.tickイベントのリスナーでリンクの描画要素(line)の始点/終了設定
- d3.forceの描画設定はd3.tickイベントリスナーの処理で実現します
- d3.forceLinkはsvgの要素(line)の始点/終点を定義して描画します
function ticked(){
	circles
  	.attr("cx", function(d){ return d.x; })
    .attr("cy", function(d){ return d.y; }) ;

  links    // svgのLineの始点/終点設定
  .attr("x1", function(d) { return d.source.x; })
  .attr("y1", function(d) {	return d.source.y; })
  .attr("x2", function(d) {	return d.target.x; })
  .attr("y2", function(d) {	return d.target.y; });
}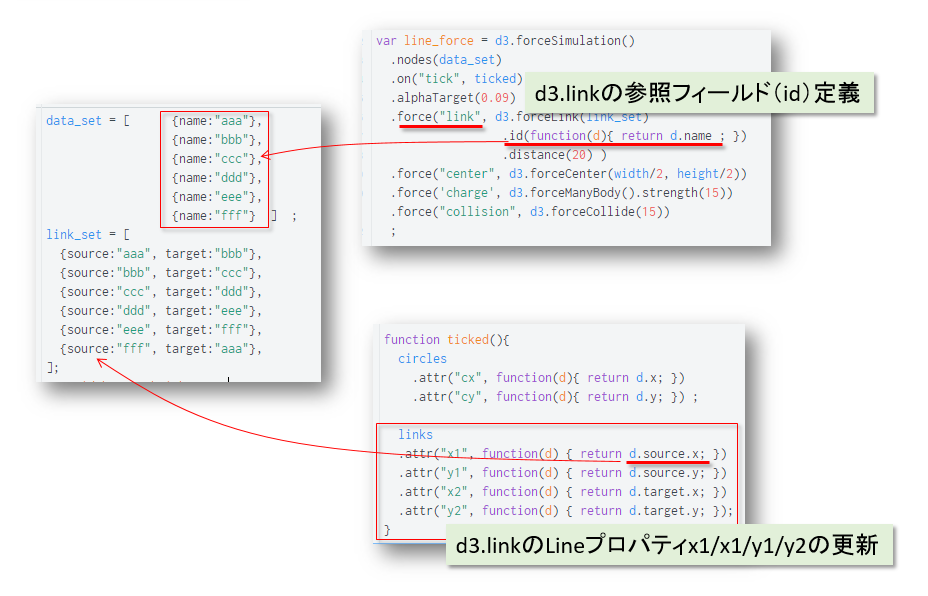
- 上記例の全コードは以下のようです
data_set = [			{name:"aaa"},
                  {name:"bbb"},
                  {name:"ccc"},
                  {name:"ddd"},
                  {name:"eee"},
                  {name:"fff"}  ]  ;
link_set = [
	{source:"aaa", target:"bbb"},
	{source:"bbb", target:"ccc"},
	{source:"ccc", target:"ddd"},
	{source:"ddd", target:"eee"},
	{source:"eee", target:"fff"},
	{source:"fff", target:"aaa"},
];
var width=600, height=300;

var force_g = d3.select("#content").append("g") ;

var links =  force_g.selectAll(".link")
	.data(link_set)
  .enter()
  .append("line")
  .attr("class", "link")
  .attr("stroke", "#000")
  .attr("stroke-weight", 1)
  ;

var circles =  force_g.selectAll("circle")
  .data(data_set)
  .enter()
  .append("circle")
  .attr("class","test-circle")
  .attr("r", 5)
  .attr("fill","lightblue")
  .call(d3.drag()
          .on("start", dragstarted)
          .on("drag", dragged)
          .on("end", dragended)
          )
  ;

var line_force = d3.forceSimulation()
	.nodes(data_set)
  .on("tick", ticked)
  .force("link", d3.forceLink(link_set)
  								.id(function(d){ return d.name ; })
                  .distance(20) )
  .force("center", d3.forceCenter(width/2, height/2))
  .force('charge', d3.forceManyBody().strength(15))
  .force("collision", d3.forceCollide(15))
  ;

function dragstarted(d) {
  if (!d3.event.active) line_force.alphaTarget(0.9).restart();
  d.fx = d.x;
  d.fy = d.y;
}

function dragged(d) {
  d.fx = d3.event.x;
  d.fy = d3.event.y;
}

function dragended(d) {
  if (!d3.event.active) line_force.alphaTarget(0);
  d.fx = null;
  d.fy = null;
 }

function ticked(){
	circles
  	.attr("cx", function(d){ return d.x; })
    .attr("cy", function(d){ return d.y; }) ;

  links
  .attr("x1", function(d) { return d.source.x; })
  .attr("y1", function(d) {	return d.source.y; })
  .attr("x2", function(d) {	return d.target.x; })
  .attr("y2", function(d) {	return d.target.y; });
}
d3.dragモジュールがオブジェクトのドラッグ、オブジェクト移動、ドロップを管理しています
- d3.dragモジュールはドラッグ、オブジェクト移動、ドロップについて、三つのイベントがあります
- start: ドラッグ開始
- drag: ドラッグしながら、オブジェクトの移動
- end: ドラッグ終了(ドロップ)
- この三つのイベントはブラウザのマウスイベントとタブレットのタッチイベントを対応しています。
- 以下のイベントの対応一覧(本家の紹介から)
Event Listening Element Drag Event Default Prevented? mousedown⁵ selection start no¹ mousemove² window¹ drag yes mouseup² window¹ end yes dragstart² window - yes selectstart² window - yes click³ window - yes touchstart selection start no⁴ touchmove selection drag yes touchend selection end no⁴ touchcancel selection end no⁴
- 以下のイベントの対応一覧(本家の紹介から)
d3.jsのイベント(start, drag, end)のキャッチと処理ロジックを作成すればドラッグ管理ができます
- この三つのイベント(start, drag, end)をキャッチして処理すれば簡単にd3.jsのドラッグ管理ができます
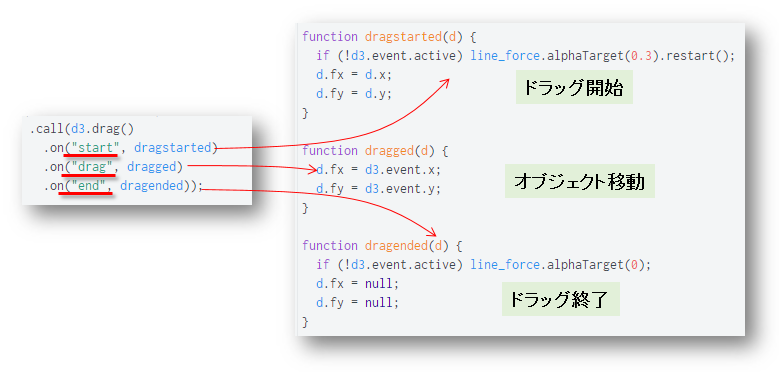
- 各オブジェクト(例:描画した円)に三つのイベント(start, drag, end)リスナーを実装します
var circles = force_g.selectAll("circle") .data(data_set) .enter() .append("circle") .attr("class","test-circle") .attr("r", function(d){ return d.val/2; }) .attr("fill","lightblue") .call(d3.drag() // ドラッグイベントリスナーの実装 .on("start", dragstarted) .on("drag", dragged) .on("end", dragended)); ; // 三つのイベント(start, drag, end)リスナー実装 function dragstarted(d) { if (!d3.event.active) line_force.alphaTarget(0.3).restart(); d.fx = d.x; d.fy = d.y; } function dragged(d) { d.fx = d3.event.x; d.fy = d3.event.y; } function dragended(d) { if (!d3.event.active) line_force.alphaTarget(0); d.fx = null; d.fy = null; } - 上記コードだけで、ドラッグ/ドロップ/オブジェクト移動ができます
data_set = [	{name:"aaa", val:58, col:100},
                  {name:"bbb", val:88, col:200},
                  {name:"ccc", val:48, col:300},
                  {name:"ddd", val:73, col:400},
                  {name:"eee", val:81, col:500},
                  {name:"fff", val:31, col:600}  ]  ;

var width=600, height=300;

var force_g = d3.select("#content")
	.append("g")
  ;
var circles =  force_g.selectAll("circle")
  .data(data_set)
  .enter()
  .append("circle")
  .attr("class","test-circle")
  .attr("r", function(d){ return d.val/2; })
  .attr("fill","lightblue")
        .call(d3.drag()
          .on("start", dragstarted)
          .on("drag", dragged)
          .on("end", dragended));
  ;


var line_force = d3.forceSimulation()
	.nodes(data_set)
  .on("tick", ticked)
  .force("center", d3.forceCenter(width/2, height/2))
  .force('charge', d3.forceManyBody().strength(5))
  .force("collision", d3.forceCollide(function(d){return d.val/2;}))
  .force("y", d3.forceY().y(150))
  ;

function dragstarted(d) {
  if (!d3.event.active) line_force.alphaTarget(0.3).restart();
  d.fx = d.x;
  d.fy = d.y;
}

function dragged(d) {
  d.fx = d3.event.x;
  d.fy = d3.event.y;
}

function dragended(d) {
  if (!d3.event.active) line_force.alphaTarget(0);
  d.fx = null;
  d.fy = null;
}

function ticked(){
	circles
  	.attr("cx", function(d){ return d.x; })
    .attr("cy", function(d){ return d.y; }) ;
    }
目的:簡単な例でd3.jsフォース(force)を利用します
- ここで、d3.js:V4を使用します(V3)のコーティング方法が大きく違うので、ご注意ください
- d3.jsのモジュール(force)に関する表現性が非常に高い例は数多く掲載されています
- ほとんどはソースのみで、説明が少ななく、わかりずらいです
- ここで、簡単の例を用いて、d3.jsのforceの動作を説明します
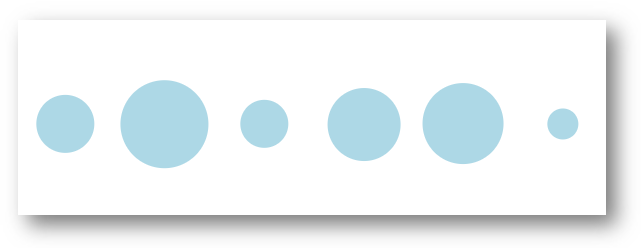
Step1:初期状態として複数の円をsvgで描画します
- svgで複数の円を描画します(円の中心座標:cx/cy=0)
var data_set = [   // 円の描画データ
		{name:"aaa", val:58},
		{name:"bbb", val:88},
		{name:"ccc", val:48},
		{name:"ddd", val:73},
		{name:"eee", val:81},
		{name:"fff", val:31}
               ] ;

// svgの描画範囲
var width=600, height=300;

// 複数の円を描画
var circles = d3.select("#content")
	.append("g")
	.selectAll("circle")
	.data(data_set)
	.enter()
	.append( "circle" )
	.attr( "class", "text-circle" )
	.attr("r", function(d){return d.val/2})
	.attr("fill", "lightblue")
       ;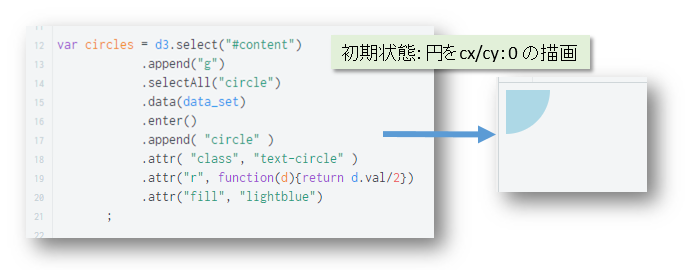
- 非常にシンプルな例なので、d3.jsので円描画の説明は省略します
Step2:force利用の第一歩:d3.forceSimulation作成
- モジュールforceを利用する最初の一歩はd3.forceSimulationを作成します
- 円を描画する配列もセットします
- tickイベントリスナーを実装します
- tickはd3のタイマーみたいのもので、force開始イベントとして利用します
- ここでtickイベントが来たら、描画された円を指定場所に移動させることにします
// forceSimulationの作成
var force = d3.forceSimulation()
	.nodes(data_set)
        .on("tick", ticked)
	;
// tickイベントリスナー
function ticked(){
	circles  // 円を指定場所に移動させる
  	.attr("cx", function(d){ return d.x; })
	.attr("cy", function(d){ return d.y; })
    ;
}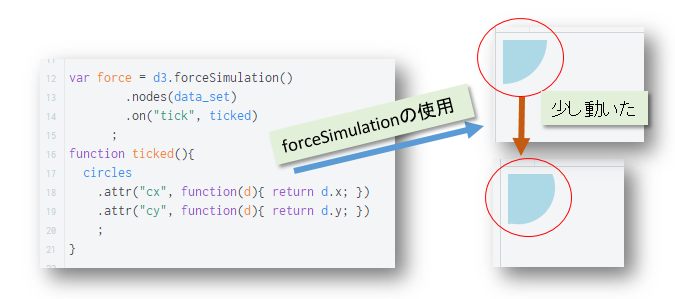
- 結果は、描画された円が少し移動しました
Step3:d3.forceSimulationのメソッド(force)で円の移動先を指定
- d3.forceSimulationのメソッド(force)を利用して、X軸方向の中心に描画された円を移動させます
- メソッド(strength:力の大きさ)を利用して、円の移動速度/摩擦を調整します
- 0~1の範囲
- 0に近づければ重く、遅くなります、1に近づければ早く、軽くなります
var force = d3.forceSimulation()
	.nodes(data_set)
        .on("tick", ticked)
	.force("x",   d3.forceX(width/2)       // X軸の中心方向へ
				.strength(0.05)  )   // 移動の速さ

			;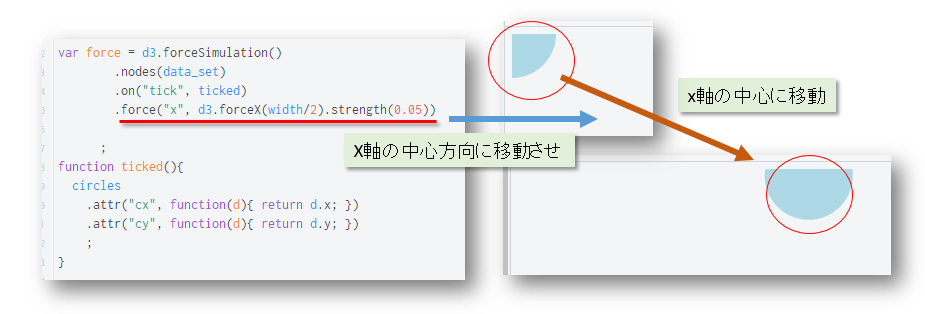
- 同様にY軸の移行方向を指定できます
Step4:d3.forceCollideで円の描画範囲を広げる
- d3.forceCollideが纏まった複数の円の描画範囲を調整し、数字を大きくして全部表示できるようにします
var force = d3.forceSimulation() .nodes(data_set) .on("tick", ticked) .force("x", d3.forceX(width/2).strength(0.05)) .force("y", d3.forceY(height/2).strength(0.05)) .force("collide", d3.forceCollide(50)) // 円の描画範囲を広げる ; - これで、簡単のforce動作例が完成です
var data_set = [
		 {name:"aaa", val:58},
                  {name:"bbb", val:88},
                  {name:"ccc", val:48},
                  {name:"ddd", val:73},
                  {name:"eee", val:81},
                  {name:"fff", val:31}
               ] ;

var width=600, height=300;

var force = d3.forceSimulation()
	.nodes(data_set)
        .on("tick", ticked)
	.force("x", d3.forceX(width/2).strength(0.05))
        .force("y", d3.forceY(height/2).strength(0.05))
        .force("collide", d3.forceCollide(50))
			;
function ticked(){
	circles
  	.attr("cx", function(d){ return d.x; })
        .attr("cy", function(d){ return d.y; })
    ;
}

var circles = d3.select("#content")
	    .append("g")
            .selectAll("circle")
            .data(data_set)
            .enter()
            .append( "circle" )
            .attr( "class", "text-circle" )
            .attr("r", function(d){return d.val/2})
            .attr("fill", "lightblue")
       ;
d3のフォースレイアウト(fouce layout)で各要素を円形状態に配置するのはよく紹介されている
- 前回紹介いたした「d3.jsのフォース(force)を理解するための簡単な例 」でも円形状態に各要素を配置します
- ネットでd3のフォースレイアウトの例を調べてみると、大半も円形状に各要素を配置しています
- 時々、一直線に各要素を配置させることもあります
d3.fouceX関数を利用して、簡単に各要素を一直線に配置させます
- 前回の例ではd3.fouceX/d3.fouceYを利用して、各要素の移動先場所に指定します
var force = d3.forceSimulation() .nodes(data_set) .on("tick", ticked) .force("x", d3.forceX(width/2).strength(0.05)) // 移動先のx座標 .force("y", d3.forceY(height/2).strength(0.05)) // 移動先のy座標 .force("collide", d3.forceCollide(50)) ; - 今回は各要素の移動先のx座標をデータセットに入れます
// データセットのcol:移動先のx座標とします data_set = [{name:"aaa", val:58, col:100}, {name:"bbb", val:88, col:200}, {name:"ccc", val:48, col:300}, {name:"ddd", val:73, col:400}, {name:"eee", val:81, col:500}, {name:"fff", val:31, col:600} ] ; - d3.forceSimulationで各要素の移動先座標をデータセットから呼び出して設定します
var line_force = d3.forceSimulation()
  .nodes(data_set)
  .on("tick", ticked)
  .force("center", d3.forceCenter(width/2, height/2))
  .force('charge', d3.forceManyBody().strength(5))
  .force("collision", d3.forceCollide(40))
  .force("x", d3.forceX().x(function(d){ return d.col; }))  // 移動先のx座標
  .force("y", d3.forceY().y(150))                           // 移動先のy座標
  ;
d3.forceCollide()/d3.forceManyBody()/d3.forceCenter()で動画効果の演出
- 今回の例では、各要素を中心から各自の配置場所に移動させるアニメーション効果を生み出しています
- d3.forceManyBody: 各要素間の引き合い効果
- d3.forceCollide:各要素を重なる具合の設定
- 今回の例ではそれぞれの移動先座標が決まっているので、この関数を利用しなくてもよい
- 今回はよりランダムのように各移動先に移動させるために使用しました
- d3.forceCenter: 各要素を指定した場所(x/y)に配置する
- 今回の例のコードは以下のようです
data_set = [{name:"aaa", val:58, col:100},
                  {name:"bbb", val:88, col:200},
                  {name:"ccc", val:48, col:300},
                  {name:"ddd", val:73, col:400},
                  {name:"eee", val:81, col:500},
                  {name:"fff", val:31, col:600}  ]  ;
var width=600, height=300;
var circles = d3.select("#content")
	.append("g")
  .selectAll("circle")
  .data(data_set)
  .enter()
  .append("circle")
  .attr("class","test-circle")
  .attr("r", function(d){ return d.val/2; })
  .attr("fill","lightblue")
  ;

var line_force = d3.forceSimulation()
	.nodes(data_set)
  .on("tick", ticked)
  .force("center", d3.forceCenter(width/2, height/2))
  .force('charge', d3.forceManyBody().strength(5))
  .force("collision", d3.forceCollide(40))
  .force("x", d3.forceX().x(function(d){ return d.col; }))
  .force("y", d3.forceY().y(150))
  ;


function ticked(){
	circles
  	.attr("cx", function(d){ return d.x; })
    .attr("cy", function(d){ return d.y; }) ;
}
d3.forceLinkがオブジェクト要素間のバネの伸縮効果の再現
- d3.forceにある一つ重要な要素d3.forceLinkよりバネの伸縮効果を生み出すことができます
- 特にドラッグ/ドロップ併合に使用すると、よりバネの伸縮効果の体験はできます
- d3.forceLinkはsvgのlineエレメントでLinkを描画します
- d3.forceSimulationのtickイベントより、動的にオブジェクト間の距離を計算しながら、lineを描画します
- d3.forceLinkのバネ効果の強さはcollision/charge/centerなどの要素の設定より調整されます
作成要点1:オブジェクト要素のリンク元(source)ターゲット先(target)設定
- 描画のオブジェクトデータセットを定義します
- オブジェクト間にリンクをつけるターゲット先にのデータセットを定義します
// 描画するオブジェクトのデータセット data_set = [{name:"aaa"}, {name:"bbb"}, {name:"ccc"}, {name:"ddd"}, {name:"eee"}, {name:"fff"} ] ; // オブジェクト間のリンク元とリンク先定義 link_set = [ {source:"aaa", target:"bbb"}, {source:"bbb", target:"ccc"}, {source:"ccc", target:"ddd"}, {source:"ddd", target:"eee"}, {source:"eee", target:"fff"}, {source:"fff", target:"aaa"}, ];- リンク元: sourceで定義
- リンク先: target で定義
- 「source」、「target」は決まりキーワード、変えることはできません
作成要点2:d3.forceSimulationでd3.forceLinkを定義
- d3.forceSimulationでforceのオブジェクト描画定義時にd3.forceLinkを定義します
var line_force = d3.forceSimulation() .nodes( data_set ) // オブジェクトのデータセット .on("tick", ticked) .force("link", d3.forceLink(link_set) // リンク元とリンク先のデータセット .id(function(d){ return d.name ; }) // オブジェクトデータセットにあるリンク要素フィールド設定 .distance(20) ) .force("center", d3.forceCenter(width/2, height/2)) .force('charge', d3.forceManyBody().strength(15)) .force("collision", d3.forceCollide(15)) // オブジェクトのぶつけ合い距離 ;- d3.forceLink().id()でのidがリンク元/先にのデータフィールド名を定義
作成要点3:d3.tickイベントのリスナーでリンクの描画要素(line)の始点/終了設定
- d3.forceの描画設定はd3.tickイベントリスナーの処理で実現します
- d3.forceLinkはsvgの要素(line)の始点/終点を定義して描画します
function ticked(){ circles .attr("cx", function(d){ return d.x; }) .attr("cy", function(d){ return d.y; }) ; links // svgのLineの始点/終点設定 .attr("x1", function(d) { return d.source.x; }) .attr("y1", function(d) { return d.source.y; }) .attr("x2", function(d) { return d.target.x; }) .attr("y2", function(d) { return d.target.y; }); } - 上記例の全コードは以下のようです
data_set = [			{name:"aaa"},
                  {name:"bbb"},
                  {name:"ccc"},
                  {name:"ddd"},
                  {name:"eee"},
                  {name:"fff"}  ]  ;
link_set = [
	{source:"aaa", target:"bbb"},
	{source:"bbb", target:"ccc"},
	{source:"ccc", target:"ddd"},
	{source:"ddd", target:"eee"},
	{source:"eee", target:"fff"},
	{source:"fff", target:"aaa"},
];
var width=600, height=300;

var force_g = d3.select("#content").append("g") ;

var links =  force_g.selectAll(".link")
	.data(link_set)
  .enter()
  .append("line")
  .attr("class", "link")
  .attr("stroke", "#000")
  .attr("stroke-weight", 1)
  ;

var circles =  force_g.selectAll("circle")
  .data(data_set)
  .enter()
  .append("circle")
  .attr("class","test-circle")
  .attr("r", 5)
  .attr("fill","lightblue")
  .call(d3.drag()
          .on("start", dragstarted)
          .on("drag", dragged)
          .on("end", dragended)
          )
  ;

var line_force = d3.forceSimulation()
	.nodes(data_set)
  .on("tick", ticked)
  .force("link", d3.forceLink(link_set)
  								.id(function(d){ return d.name ; })
                  .distance(20) )
  .force("center", d3.forceCenter(width/2, height/2))
  .force('charge', d3.forceManyBody().strength(15))
  .force("collision", d3.forceCollide(15))
  ;

function dragstarted(d) {
  if (!d3.event.active) line_force.alphaTarget(0.9).restart();
  d.fx = d.x;
  d.fy = d.y;
}

function dragged(d) {
  d.fx = d3.event.x;
  d.fy = d3.event.y;
}

function dragended(d) {
  if (!d3.event.active) line_force.alphaTarget(0);
  d.fx = null;
  d.fy = null;
 }

function ticked(){
	circles
  	.attr("cx", function(d){ return d.x; })
    .attr("cy", function(d){ return d.y; }) ;

  links
  .attr("x1", function(d) { return d.source.x; })
  .attr("y1", function(d) {	return d.source.y; })
  .attr("x2", function(d) {	return d.target.x; })
  .attr("y2", function(d) {	return d.target.y; });
}
d3.dragモジュールがオブジェクトのドラッグ、オブジェクト移動、ドロップを管理しています
- d3.dragモジュールはドラッグ、オブジェクト移動、ドロップについて、三つのイベントがあります
- start: ドラッグ開始
- drag: ドラッグしながら、オブジェクトの移動
- end: ドラッグ終了(ドロップ)
- この三つのイベントはブラウザのマウスイベントとタブレットのタッチイベントを対応しています。
- 以下のイベントの対応一覧(本家の紹介から)
Event Listening Element Drag Event Default Prevented? mousedown⁵ selection start no¹ mousemove² window¹ drag yes mouseup² window¹ end yes dragstart² window - yes selectstart² window - yes click³ window - yes touchstart selection start no⁴ touchmove selection drag yes touchend selection end no⁴ touchcancel selection end no⁴
- 以下のイベントの対応一覧(本家の紹介から)
d3.jsのイベント(start, drag, end)のキャッチと処理ロジックを作成すればドラッグ管理ができます
- この三つのイベント(start, drag, end)をキャッチして処理すれば簡単にd3.jsのドラッグ管理ができます
- 各オブジェクト(例:描画した円)に三つのイベント(start, drag, end)リスナーを実装します
var circles = force_g.selectAll("circle") .data(data_set) .enter() .append("circle") .attr("class","test-circle") .attr("r", function(d){ return d.val/2; }) .attr("fill","lightblue") .call(d3.drag() // ドラッグイベントリスナーの実装 .on("start", dragstarted) .on("drag", dragged) .on("end", dragended)); ; // 三つのイベント(start, drag, end)リスナー実装 function dragstarted(d) { if (!d3.event.active) line_force.alphaTarget(0.3).restart(); d.fx = d.x; d.fy = d.y; } function dragged(d) { d.fx = d3.event.x; d.fy = d3.event.y; } function dragended(d) { if (!d3.event.active) line_force.alphaTarget(0); d.fx = null; d.fy = null; } - 上記コードだけで、ドラッグ/ドロップ/オブジェクト移動ができます
data_set = [	{name:"aaa", val:58, col:100},
                  {name:"bbb", val:88, col:200},
                  {name:"ccc", val:48, col:300},
                  {name:"ddd", val:73, col:400},
                  {name:"eee", val:81, col:500},
                  {name:"fff", val:31, col:600}  ]  ;

var width=600, height=300;

var force_g = d3.select("#content")
	.append("g")
  ;
var circles =  force_g.selectAll("circle")
  .data(data_set)
  .enter()
  .append("circle")
  .attr("class","test-circle")
  .attr("r", function(d){ return d.val/2; })
  .attr("fill","lightblue")
        .call(d3.drag()
          .on("start", dragstarted)
          .on("drag", dragged)
          .on("end", dragended));
  ;


var line_force = d3.forceSimulation()
	.nodes(data_set)
  .on("tick", ticked)
  .force("center", d3.forceCenter(width/2, height/2))
  .force('charge', d3.forceManyBody().strength(5))
  .force("collision", d3.forceCollide(function(d){return d.val/2;}))
  .force("y", d3.forceY().y(150))
  ;

function dragstarted(d) {
  if (!d3.event.active) line_force.alphaTarget(0.3).restart();
  d.fx = d.x;
  d.fy = d.y;
}

function dragged(d) {
  d.fx = d3.event.x;
  d.fy = d3.event.y;
}

function dragended(d) {
  if (!d3.event.active) line_force.alphaTarget(0);
  d.fx = null;
  d.fy = null;
}

function ticked(){
	circles
  	.attr("cx", function(d){ return d.x; })
    .attr("cy", function(d){ return d.y; }) ;
    }
目的:簡単な例でd3.jsフォース(force)を利用します
- ここで、d3.js:V4を使用します(V3)のコーティング方法が大きく違うので、ご注意ください
- d3.jsのモジュール(force)に関する表現性が非常に高い例は数多く掲載されています
- ほとんどはソースのみで、説明が少ななく、わかりずらいです
- ここで、簡単の例を用いて、d3.jsのforceの動作を説明します
Step1:初期状態として複数の円をsvgで描画します
- svgで複数の円を描画します(円の中心座標:cx/cy=0)
var data_set = [ // 円の描画データ {name:"aaa", val:58}, {name:"bbb", val:88}, {name:"ccc", val:48}, {name:"ddd", val:73}, {name:"eee", val:81}, {name:"fff", val:31} ] ; // svgの描画範囲 var width=600, height=300; // 複数の円を描画 var circles = d3.select("#content") .append("g") .selectAll("circle") .data(data_set) .enter() .append( "circle" ) .attr( "class", "text-circle" ) .attr("r", function(d){return d.val/2}) .attr("fill", "lightblue") ; - 非常にシンプルな例なので、d3.jsので円描画の説明は省略します
Step2:force利用の第一歩:d3.forceSimulation作成
- モジュールforceを利用する最初の一歩はd3.forceSimulationを作成します
- 円を描画する配列もセットします
- tickイベントリスナーを実装します
- tickはd3のタイマーみたいのもので、force開始イベントとして利用します
- ここでtickイベントが来たら、描画された円を指定場所に移動させることにします
// forceSimulationの作成
var force = d3.forceSimulation()
	.nodes(data_set)
        .on("tick", ticked)
	;
// tickイベントリスナー
function ticked(){
	circles  // 円を指定場所に移動させる
  	.attr("cx", function(d){ return d.x; })
	.attr("cy", function(d){ return d.y; })
    ;
}
- 結果は、描画された円が少し移動しました
Step3:d3.forceSimulationのメソッド(force)で円の移動先を指定
- d3.forceSimulationのメソッド(force)を利用して、X軸方向の中心に描画された円を移動させます
- メソッド(strength:力の大きさ)を利用して、円の移動速度/摩擦を調整します
- 0~1の範囲
- 0に近づければ重く、遅くなります、1に近づければ早く、軽くなります
var force = d3.forceSimulation()
	.nodes(data_set)
        .on("tick", ticked)
	.force("x",   d3.forceX(width/2)       // X軸の中心方向へ
				.strength(0.05)  )   // 移動の速さ

			;
- 同様にY軸の移行方向を指定できます
Step4:d3.forceCollideで円の描画範囲を広げる
- d3.forceCollideが纏まった複数の円の描画範囲を調整し、数字を大きくして全部表示できるようにします
var force = d3.forceSimulation() .nodes(data_set) .on("tick", ticked) .force("x", d3.forceX(width/2).strength(0.05)) .force("y", d3.forceY(height/2).strength(0.05)) .force("collide", d3.forceCollide(50)) // 円の描画範囲を広げる ; - これで、簡単のforce動作例が完成です
var data_set = [
		 {name:"aaa", val:58},
                  {name:"bbb", val:88},
                  {name:"ccc", val:48},
                  {name:"ddd", val:73},
                  {name:"eee", val:81},
                  {name:"fff", val:31}
               ] ;

var width=600, height=300;

var force = d3.forceSimulation()
	.nodes(data_set)
        .on("tick", ticked)
	.force("x", d3.forceX(width/2).strength(0.05))
        .force("y", d3.forceY(height/2).strength(0.05))
        .force("collide", d3.forceCollide(50))
			;
function ticked(){
	circles
  	.attr("cx", function(d){ return d.x; })
        .attr("cy", function(d){ return d.y; })
    ;
}

var circles = d3.select("#content")
	    .append("g")
            .selectAll("circle")
            .data(data_set)
            .enter()
            .append( "circle" )
            .attr( "class", "text-circle" )
            .attr("r", function(d){return d.val/2})
            .attr("fill", "lightblue")
       ;
d3のフォースレイアウト(fouce layout)で各要素を円形状態に配置するのはよく紹介されている
- 前回紹介いたした「d3.jsのフォース(force)を理解するための簡単な例 」でも円形状態に各要素を配置します
- ネットでd3のフォースレイアウトの例を調べてみると、大半も円形状に各要素を配置しています
- 時々、一直線に各要素を配置させることもあります
d3.fouceX関数を利用して、簡単に各要素を一直線に配置させます
- 前回の例ではd3.fouceX/d3.fouceYを利用して、各要素の移動先場所に指定します
var force = d3.forceSimulation() .nodes(data_set) .on("tick", ticked) .force("x", d3.forceX(width/2).strength(0.05)) // 移動先のx座標 .force("y", d3.forceY(height/2).strength(0.05)) // 移動先のy座標 .force("collide", d3.forceCollide(50)) ; - 今回は各要素の移動先のx座標をデータセットに入れます
// データセットのcol:移動先のx座標とします data_set = [{name:"aaa", val:58, col:100}, {name:"bbb", val:88, col:200}, {name:"ccc", val:48, col:300}, {name:"ddd", val:73, col:400}, {name:"eee", val:81, col:500}, {name:"fff", val:31, col:600} ] ; - d3.forceSimulationで各要素の移動先座標をデータセットから呼び出して設定します
var line_force = d3.forceSimulation()
  .nodes(data_set)
  .on("tick", ticked)
  .force("center", d3.forceCenter(width/2, height/2))
  .force('charge', d3.forceManyBody().strength(5))
  .force("collision", d3.forceCollide(40))
  .force("x", d3.forceX().x(function(d){ return d.col; }))  // 移動先のx座標
  .force("y", d3.forceY().y(150))                           // 移動先のy座標
  ;
d3.forceCollide()/d3.forceManyBody()/d3.forceCenter()で動画効果の演出
- 今回の例では、各要素を中心から各自の配置場所に移動させるアニメーション効果を生み出しています
- d3.forceManyBody: 各要素間の引き合い効果
- d3.forceCollide:各要素を重なる具合の設定
- 今回の例ではそれぞれの移動先座標が決まっているので、この関数を利用しなくてもよい
- 今回はよりランダムのように各移動先に移動させるために使用しました
- d3.forceCenter: 各要素を指定した場所(x/y)に配置する
- 今回の例のコードは以下のようです
data_set = [{name:"aaa", val:58, col:100},
                  {name:"bbb", val:88, col:200},
                  {name:"ccc", val:48, col:300},
                  {name:"ddd", val:73, col:400},
                  {name:"eee", val:81, col:500},
                  {name:"fff", val:31, col:600}  ]  ;
var width=600, height=300;
var circles = d3.select("#content")
	.append("g")
  .selectAll("circle")
  .data(data_set)
  .enter()
  .append("circle")
  .attr("class","test-circle")
  .attr("r", function(d){ return d.val/2; })
  .attr("fill","lightblue")
  ;

var line_force = d3.forceSimulation()
	.nodes(data_set)
  .on("tick", ticked)
  .force("center", d3.forceCenter(width/2, height/2))
  .force('charge', d3.forceManyBody().strength(5))
  .force("collision", d3.forceCollide(40))
  .force("x", d3.forceX().x(function(d){ return d.col; }))
  .force("y", d3.forceY().y(150))
  ;


function ticked(){
	circles
  	.attr("cx", function(d){ return d.x; })
    .attr("cy", function(d){ return d.y; }) ;
}
d3.forceLinkがオブジェクト要素間のバネの伸縮効果の再現
- d3.forceにある一つ重要な要素d3.forceLinkよりバネの伸縮効果を生み出すことができます
- 特にドラッグ/ドロップ併合に使用すると、よりバネの伸縮効果の体験はできます
- d3.forceLinkはsvgのlineエレメントでLinkを描画します
- d3.forceSimulationのtickイベントより、動的にオブジェクト間の距離を計算しながら、lineを描画します
- d3.forceLinkのバネ効果の強さはcollision/charge/centerなどの要素の設定より調整されます
作成要点1:オブジェクト要素のリンク元(source)ターゲット先(target)設定
- 描画のオブジェクトデータセットを定義します
- オブジェクト間にリンクをつけるターゲット先にのデータセットを定義します
// 描画するオブジェクトのデータセット data_set = [{name:"aaa"}, {name:"bbb"}, {name:"ccc"}, {name:"ddd"}, {name:"eee"}, {name:"fff"} ] ; // オブジェクト間のリンク元とリンク先定義 link_set = [ {source:"aaa", target:"bbb"}, {source:"bbb", target:"ccc"}, {source:"ccc", target:"ddd"}, {source:"ddd", target:"eee"}, {source:"eee", target:"fff"}, {source:"fff", target:"aaa"}, ];- リンク元: sourceで定義
- リンク先: target で定義
- 「source」、「target」は決まりキーワード、変えることはできません
作成要点2:d3.forceSimulationでd3.forceLinkを定義
- d3.forceSimulationでforceのオブジェクト描画定義時にd3.forceLinkを定義します
var line_force = d3.forceSimulation() .nodes( data_set ) // オブジェクトのデータセット .on("tick", ticked) .force("link", d3.forceLink(link_set) // リンク元とリンク先のデータセット .id(function(d){ return d.name ; }) // オブジェクトデータセットにあるリンク要素フィールド設定 .distance(20) ) .force("center", d3.forceCenter(width/2, height/2)) .force('charge', d3.forceManyBody().strength(15)) .force("collision", d3.forceCollide(15)) // オブジェクトのぶつけ合い距離 ;- d3.forceLink().id()でのidがリンク元/先にのデータフィールド名を定義
作成要点3:d3.tickイベントのリスナーでリンクの描画要素(line)の始点/終了設定
- d3.forceの描画設定はd3.tickイベントリスナーの処理で実現します
- d3.forceLinkはsvgの要素(line)の始点/終点を定義して描画します
function ticked(){ circles .attr("cx", function(d){ return d.x; }) .attr("cy", function(d){ return d.y; }) ; links // svgのLineの始点/終点設定 .attr("x1", function(d) { return d.source.x; }) .attr("y1", function(d) { return d.source.y; }) .attr("x2", function(d) { return d.target.x; }) .attr("y2", function(d) { return d.target.y; }); } - 上記例の全コードは以下のようです
data_set = [ {name:"aaa"}, {name:"bbb"}, {name:"ccc"}, {name:"ddd"}, {name:"eee"}, {name:"fff"} ] ; link_set = [ {source:"aaa", target:"bbb"}, {source:"bbb", target:"ccc"}, {source:"ccc", target:"ddd"}, {source:"ddd", target:"eee"}, {source:"eee", target:"fff"}, {source:"fff", target:"aaa"}, ]; var width=600, height=300; var force_g = d3.select("#content").append("g") ; var links = force_g.selectAll(".link") .data(link_set) .enter() .append("line") .attr("class", "link") .attr("stroke", "#000") .attr("stroke-weight", 1) ; var circles = force_g.selectAll("circle") .data(data_set) .enter() .append("circle") .attr("class","test-circle") .attr("r", 5) .attr("fill","lightblue") .call(d3.drag() .on("start", dragstarted) .on("drag", dragged) .on("end", dragended) ) ; var line_force = d3.forceSimulation() .nodes(data_set) .on("tick", ticked) .force("link", d3.forceLink(link_set) .id(function(d){ return d.name ; }) .distance(20) ) .force("center", d3.forceCenter(width/2, height/2)) .force('charge', d3.forceManyBody().strength(15)) .force("collision", d3.forceCollide(15)) ; function dragstarted(d) { if (!d3.event.active) line_force.alphaTarget(0.9).restart(); d.fx = d.x; d.fy = d.y; } function dragged(d) { d.fx = d3.event.x; d.fy = d3.event.y; } function dragended(d) { if (!d3.event.active) line_force.alphaTarget(0); d.fx = null; d.fy = null; } function ticked(){ circles .attr("cx", function(d){ return d.x; }) .attr("cy", function(d){ return d.y; }) ; links .attr("x1", function(d) { return d.source.x; }) .attr("y1", function(d) { return d.source.y; }) .attr("x2", function(d) { return d.target.x; }) .attr("y2", function(d) { return d.target.y; }); }
d3.dragモジュールがオブジェクトのドラッグ、オブジェクト移動、ドロップを管理しています
- d3.dragモジュールはドラッグ、オブジェクト移動、ドロップについて、三つのイベントがあります
- start: ドラッグ開始
- drag: ドラッグしながら、オブジェクトの移動
- end: ドラッグ終了(ドロップ)
- この三つのイベントはブラウザのマウスイベントとタブレットのタッチイベントを対応しています。
- 以下のイベントの対応一覧(本家の紹介から)
Event Listening Element Drag Event Default Prevented? mousedown⁵ selection start no¹ mousemove² window¹ drag yes mouseup² window¹ end yes dragstart² window - yes selectstart² window - yes click³ window - yes touchstart selection start no⁴ touchmove selection drag yes touchend selection end no⁴ touchcancel selection end no⁴
- 以下のイベントの対応一覧(本家の紹介から)
d3.jsのイベント(start, drag, end)のキャッチと処理ロジックを作成すればドラッグ管理ができます
- この三つのイベント(start, drag, end)をキャッチして処理すれば簡単にd3.jsのドラッグ管理ができます
- 各オブジェクト(例:描画した円)に三つのイベント(start, drag, end)リスナーを実装します
var circles = force_g.selectAll("circle") .data(data_set) .enter() .append("circle") .attr("class","test-circle") .attr("r", function(d){ return d.val/2; }) .attr("fill","lightblue") .call(d3.drag() // ドラッグイベントリスナーの実装 .on("start", dragstarted) .on("drag", dragged) .on("end", dragended)); ; // 三つのイベント(start, drag, end)リスナー実装 function dragstarted(d) { if (!d3.event.active) line_force.alphaTarget(0.3).restart(); d.fx = d.x; d.fy = d.y; } function dragged(d) { d.fx = d3.event.x; d.fy = d3.event.y; } function dragended(d) { if (!d3.event.active) line_force.alphaTarget(0); d.fx = null; d.fy = null; } - 上記コードだけで、ドラッグ/ドロップ/オブジェクト移動ができます
data_set = [ {name:"aaa", val:58, col:100}, {name:"bbb", val:88, col:200}, {name:"ccc", val:48, col:300}, {name:"ddd", val:73, col:400}, {name:"eee", val:81, col:500}, {name:"fff", val:31, col:600} ] ; var width=600, height=300; var force_g = d3.select("#content") .append("g") ; var circles = force_g.selectAll("circle") .data(data_set) .enter() .append("circle") .attr("class","test-circle") .attr("r", function(d){ return d.val/2; }) .attr("fill","lightblue") .call(d3.drag() .on("start", dragstarted) .on("drag", dragged) .on("end", dragended)); ; var line_force = d3.forceSimulation() .nodes(data_set) .on("tick", ticked) .force("center", d3.forceCenter(width/2, height/2)) .force('charge', d3.forceManyBody().strength(5)) .force("collision", d3.forceCollide(function(d){return d.val/2;})) .force("y", d3.forceY().y(150)) ; function dragstarted(d) { if (!d3.event.active) line_force.alphaTarget(0.3).restart(); d.fx = d.x; d.fy = d.y; } function dragged(d) { d.fx = d3.event.x; d.fy = d3.event.y; } function dragended(d) { if (!d3.event.active) line_force.alphaTarget(0); d.fx = null; d.fy = null; } function ticked(){ circles .attr("cx", function(d){ return d.x; }) .attr("cy", function(d){ return d.y; }) ; }
目的:簡単な例でd3.jsフォース(force)を利用します
- ここで、d3.js:V4を使用します(V3)のコーティング方法が大きく違うので、ご注意ください
- d3.jsのモジュール(force)に関する表現性が非常に高い例は数多く掲載されています
- ほとんどはソースのみで、説明が少ななく、わかりずらいです
- ここで、簡単の例を用いて、d3.jsのforceの動作を説明します
Step1:初期状態として複数の円をsvgで描画します
- svgで複数の円を描画します(円の中心座標:cx/cy=0)
var data_set = [ // 円の描画データ {name:"aaa", val:58}, {name:"bbb", val:88}, {name:"ccc", val:48}, {name:"ddd", val:73}, {name:"eee", val:81}, {name:"fff", val:31} ] ; // svgの描画範囲 var width=600, height=300; // 複数の円を描画 var circles = d3.select("#content") .append("g") .selectAll("circle") .data(data_set) .enter() .append( "circle" ) .attr( "class", "text-circle" ) .attr("r", function(d){return d.val/2}) .attr("fill", "lightblue") ; - 非常にシンプルな例なので、d3.jsので円描画の説明は省略します
Step2:force利用の第一歩:d3.forceSimulation作成
- モジュールforceを利用する最初の一歩はd3.forceSimulationを作成します
- 円を描画する配列もセットします
- tickイベントリスナーを実装します
- tickはd3のタイマーみたいのもので、force開始イベントとして利用します
- ここでtickイベントが来たら、描画された円を指定場所に移動させることにします
// forceSimulationの作成 var force = d3.forceSimulation() .nodes(data_set) .on("tick", ticked) ; // tickイベントリスナー function ticked(){ circles // 円を指定場所に移動させる .attr("cx", function(d){ return d.x; }) .attr("cy", function(d){ return d.y; }) ; }
- 結果は、描画された円が少し移動しました
Step3:d3.forceSimulationのメソッド(force)で円の移動先を指定
- d3.forceSimulationのメソッド(force)を利用して、X軸方向の中心に描画された円を移動させます
- メソッド(strength:力の大きさ)を利用して、円の移動速度/摩擦を調整します
- 0~1の範囲
- 0に近づければ重く、遅くなります、1に近づければ早く、軽くなります
var force = d3.forceSimulation() .nodes(data_set) .on("tick", ticked) .force("x", d3.forceX(width/2) // X軸の中心方向へ .strength(0.05) ) // 移動の速さ ;
- 同様にY軸の移行方向を指定できます
Step4:d3.forceCollideで円の描画範囲を広げる
- d3.forceCollideが纏まった複数の円の描画範囲を調整し、数字を大きくして全部表示できるようにします
var force = d3.forceSimulation() .nodes(data_set) .on("tick", ticked) .force("x", d3.forceX(width/2).strength(0.05)) .force("y", d3.forceY(height/2).strength(0.05)) .force("collide", d3.forceCollide(50)) // 円の描画範囲を広げる ; - これで、簡単のforce動作例が完成です
var data_set = [ {name:"aaa", val:58}, {name:"bbb", val:88}, {name:"ccc", val:48}, {name:"ddd", val:73}, {name:"eee", val:81}, {name:"fff", val:31} ] ; var width=600, height=300; var force = d3.forceSimulation() .nodes(data_set) .on("tick", ticked) .force("x", d3.forceX(width/2).strength(0.05)) .force("y", d3.forceY(height/2).strength(0.05)) .force("collide", d3.forceCollide(50)) ; function ticked(){ circles .attr("cx", function(d){ return d.x; }) .attr("cy", function(d){ return d.y; }) ; } var circles = d3.select("#content") .append("g") .selectAll("circle") .data(data_set) .enter() .append( "circle" ) .attr( "class", "text-circle" ) .attr("r", function(d){return d.val/2}) .attr("fill", "lightblue") ;
d3のフォースレイアウト(fouce layout)で各要素を円形状態に配置するのはよく紹介されている
- 前回紹介いたした「d3.jsのフォース(force)を理解するための簡単な例 」でも円形状態に各要素を配置します
- ネットでd3のフォースレイアウトの例を調べてみると、大半も円形状に各要素を配置しています
- 時々、一直線に各要素を配置させることもあります
d3.fouceX関数を利用して、簡単に各要素を一直線に配置させます
- 前回の例ではd3.fouceX/d3.fouceYを利用して、各要素の移動先場所に指定します
var force = d3.forceSimulation() .nodes(data_set) .on("tick", ticked) .force("x", d3.forceX(width/2).strength(0.05)) // 移動先のx座標 .force("y", d3.forceY(height/2).strength(0.05)) // 移動先のy座標 .force("collide", d3.forceCollide(50)) ; - 今回は各要素の移動先のx座標をデータセットに入れます
// データセットのcol:移動先のx座標とします data_set = [{name:"aaa", val:58, col:100}, {name:"bbb", val:88, col:200}, {name:"ccc", val:48, col:300}, {name:"ddd", val:73, col:400}, {name:"eee", val:81, col:500}, {name:"fff", val:31, col:600} ] ; - d3.forceSimulationで各要素の移動先座標をデータセットから呼び出して設定します
var line_force = d3.forceSimulation() .nodes(data_set) .on("tick", ticked) .force("center", d3.forceCenter(width/2, height/2)) .force('charge', d3.forceManyBody().strength(5)) .force("collision", d3.forceCollide(40)) .force("x", d3.forceX().x(function(d){ return d.col; })) // 移動先のx座標 .force("y", d3.forceY().y(150)) // 移動先のy座標 ;
d3.forceCollide()/d3.forceManyBody()/d3.forceCenter()で動画効果の演出
- 今回の例では、各要素を中心から各自の配置場所に移動させるアニメーション効果を生み出しています
- d3.forceManyBody: 各要素間の引き合い効果
- d3.forceCollide:各要素を重なる具合の設定
- 今回の例ではそれぞれの移動先座標が決まっているので、この関数を利用しなくてもよい
- 今回はよりランダムのように各移動先に移動させるために使用しました
- d3.forceCenter: 各要素を指定した場所(x/y)に配置する
- 今回の例のコードは以下のようです
data_set = [{name:"aaa", val:58, col:100}, {name:"bbb", val:88, col:200}, {name:"ccc", val:48, col:300}, {name:"ddd", val:73, col:400}, {name:"eee", val:81, col:500}, {name:"fff", val:31, col:600} ] ; var width=600, height=300; var circles = d3.select("#content") .append("g") .selectAll("circle") .data(data_set) .enter() .append("circle") .attr("class","test-circle") .attr("r", function(d){ return d.val/2; }) .attr("fill","lightblue") ; var line_force = d3.forceSimulation() .nodes(data_set) .on("tick", ticked) .force("center", d3.forceCenter(width/2, height/2)) .force('charge', d3.forceManyBody().strength(5)) .force("collision", d3.forceCollide(40)) .force("x", d3.forceX().x(function(d){ return d.col; })) .force("y", d3.forceY().y(150)) ; function ticked(){ circles .attr("cx", function(d){ return d.x; }) .attr("cy", function(d){ return d.y; }) ; }
d3.forceLinkがオブジェクト要素間のバネの伸縮効果の再現
- d3.forceにある一つ重要な要素d3.forceLinkよりバネの伸縮効果を生み出すことができます
- 特にドラッグ/ドロップ併合に使用すると、よりバネの伸縮効果の体験はできます
- d3.forceLinkはsvgのlineエレメントでLinkを描画します
- d3.forceSimulationのtickイベントより、動的にオブジェクト間の距離を計算しながら、lineを描画します
- d3.forceLinkのバネ効果の強さはcollision/charge/centerなどの要素の設定より調整されます
作成要点1:オブジェクト要素のリンク元(source)ターゲット先(target)設定
- 描画のオブジェクトデータセットを定義します
- オブジェクト間にリンクをつけるターゲット先にのデータセットを定義します
// 描画するオブジェクトのデータセット data_set = [{name:"aaa"}, {name:"bbb"}, {name:"ccc"}, {name:"ddd"}, {name:"eee"}, {name:"fff"} ] ; // オブジェクト間のリンク元とリンク先定義 link_set = [ {source:"aaa", target:"bbb"}, {source:"bbb", target:"ccc"}, {source:"ccc", target:"ddd"}, {source:"ddd", target:"eee"}, {source:"eee", target:"fff"}, {source:"fff", target:"aaa"}, ];- リンク元: sourceで定義
- リンク先: target で定義
- 「source」、「target」は決まりキーワード、変えることはできません
作成要点2:d3.forceSimulationでd3.forceLinkを定義
- d3.forceSimulationでforceのオブジェクト描画定義時にd3.forceLinkを定義します
var line_force = d3.forceSimulation() .nodes( data_set ) // オブジェクトのデータセット .on("tick", ticked) .force("link", d3.forceLink(link_set) // リンク元とリンク先のデータセット .id(function(d){ return d.name ; }) // オブジェクトデータセットにあるリンク要素フィールド設定 .distance(20) ) .force("center", d3.forceCenter(width/2, height/2)) .force('charge', d3.forceManyBody().strength(15)) .force("collision", d3.forceCollide(15)) // オブジェクトのぶつけ合い距離 ;- d3.forceLink().id()でのidがリンク元/先にのデータフィールド名を定義
作成要点3:d3.tickイベントのリスナーでリンクの描画要素(line)の始点/終了設定
- d3.forceの描画設定はd3.tickイベントリスナーの処理で実現します
- d3.forceLinkはsvgの要素(line)の始点/終点を定義して描画します
function ticked(){ circles .attr("cx", function(d){ return d.x; }) .attr("cy", function(d){ return d.y; }) ; links // svgのLineの始点/終点設定 .attr("x1", function(d) { return d.source.x; }) .attr("y1", function(d) { return d.source.y; }) .attr("x2", function(d) { return d.target.x; }) .attr("y2", function(d) { return d.target.y; }); } - 上記例の全コードは以下のようです
data_set = [ {name:"aaa"}, {name:"bbb"}, {name:"ccc"}, {name:"ddd"}, {name:"eee"}, {name:"fff"} ] ; link_set = [ {source:"aaa", target:"bbb"}, {source:"bbb", target:"ccc"}, {source:"ccc", target:"ddd"}, {source:"ddd", target:"eee"}, {source:"eee", target:"fff"}, {source:"fff", target:"aaa"}, ]; var width=600, height=300; var force_g = d3.select("#content").append("g") ; var links = force_g.selectAll(".link") .data(link_set) .enter() .append("line") .attr("class", "link") .attr("stroke", "#000") .attr("stroke-weight", 1) ; var circles = force_g.selectAll("circle") .data(data_set) .enter() .append("circle") .attr("class","test-circle") .attr("r", 5) .attr("fill","lightblue") .call(d3.drag() .on("start", dragstarted) .on("drag", dragged) .on("end", dragended) ) ; var line_force = d3.forceSimulation() .nodes(data_set) .on("tick", ticked) .force("link", d3.forceLink(link_set) .id(function(d){ return d.name ; }) .distance(20) ) .force("center", d3.forceCenter(width/2, height/2)) .force('charge', d3.forceManyBody().strength(15)) .force("collision", d3.forceCollide(15)) ; function dragstarted(d) { if (!d3.event.active) line_force.alphaTarget(0.9).restart(); d.fx = d.x; d.fy = d.y; } function dragged(d) { d.fx = d3.event.x; d.fy = d3.event.y; } function dragended(d) { if (!d3.event.active) line_force.alphaTarget(0); d.fx = null; d.fy = null; } function ticked(){ circles .attr("cx", function(d){ return d.x; }) .attr("cy", function(d){ return d.y; }) ; links .attr("x1", function(d) { return d.source.x; }) .attr("y1", function(d) { return d.source.y; }) .attr("x2", function(d) { return d.target.x; }) .attr("y2", function(d) { return d.target.y; }); }
d3.dragモジュールがオブジェクトのドラッグ、オブジェクト移動、ドロップを管理しています
- d3.dragモジュールはドラッグ、オブジェクト移動、ドロップについて、三つのイベントがあります
- start: ドラッグ開始
- drag: ドラッグしながら、オブジェクトの移動
- end: ドラッグ終了(ドロップ)
- この三つのイベントはブラウザのマウスイベントとタブレットのタッチイベントを対応しています。
- 以下のイベントの対応一覧(本家の紹介から)
Event Listening Element Drag Event Default Prevented? mousedown⁵ selection start no¹ mousemove² window¹ drag yes mouseup² window¹ end yes dragstart² window - yes selectstart² window - yes click³ window - yes touchstart selection start no⁴ touchmove selection drag yes touchend selection end no⁴ touchcancel selection end no⁴
- 以下のイベントの対応一覧(本家の紹介から)
d3.jsのイベント(start, drag, end)のキャッチと処理ロジックを作成すればドラッグ管理ができます
- この三つのイベント(start, drag, end)をキャッチして処理すれば簡単にd3.jsのドラッグ管理ができます
- 各オブジェクト(例:描画した円)に三つのイベント(start, drag, end)リスナーを実装します
var circles = force_g.selectAll("circle") .data(data_set) .enter() .append("circle") .attr("class","test-circle") .attr("r", function(d){ return d.val/2; }) .attr("fill","lightblue") .call(d3.drag() // ドラッグイベントリスナーの実装 .on("start", dragstarted) .on("drag", dragged) .on("end", dragended)); ; // 三つのイベント(start, drag, end)リスナー実装 function dragstarted(d) { if (!d3.event.active) line_force.alphaTarget(0.3).restart(); d.fx = d.x; d.fy = d.y; } function dragged(d) { d.fx = d3.event.x; d.fy = d3.event.y; } function dragended(d) { if (!d3.event.active) line_force.alphaTarget(0); d.fx = null; d.fy = null; } - 上記コードだけで、ドラッグ/ドロップ/オブジェクト移動ができます
data_set = [ {name:"aaa", val:58, col:100}, {name:"bbb", val:88, col:200}, {name:"ccc", val:48, col:300}, {name:"ddd", val:73, col:400}, {name:"eee", val:81, col:500}, {name:"fff", val:31, col:600} ] ; var width=600, height=300; var force_g = d3.select("#content") .append("g") ; var circles = force_g.selectAll("circle") .data(data_set) .enter() .append("circle") .attr("class","test-circle") .attr("r", function(d){ return d.val/2; }) .attr("fill","lightblue") .call(d3.drag() .on("start", dragstarted) .on("drag", dragged) .on("end", dragended)); ; var line_force = d3.forceSimulation() .nodes(data_set) .on("tick", ticked) .force("center", d3.forceCenter(width/2, height/2)) .force('charge', d3.forceManyBody().strength(5)) .force("collision", d3.forceCollide(function(d){return d.val/2;})) .force("y", d3.forceY().y(150)) ; function dragstarted(d) { if (!d3.event.active) line_force.alphaTarget(0.3).restart(); d.fx = d.x; d.fy = d.y; } function dragged(d) { d.fx = d3.event.x; d.fy = d3.event.y; } function dragended(d) { if (!d3.event.active) line_force.alphaTarget(0); d.fx = null; d.fy = null; } function ticked(){ circles .attr("cx", function(d){ return d.x; }) .attr("cy", function(d){ return d.y; }) ; }
d3のフォースレイアウト(fouce layout)で各要素を円形状態に配置するのはよく紹介されている
- 前回紹介いたした「d3.jsのフォース(force)を理解するための簡単な例 」でも円形状態に各要素を配置します
- ネットでd3のフォースレイアウトの例を調べてみると、大半も円形状に各要素を配置しています
- 時々、一直線に各要素を配置させることもあります
d3.fouceX関数を利用して、簡単に各要素を一直線に配置させます
- 前回の例ではd3.fouceX/d3.fouceYを利用して、各要素の移動先場所に指定します
var force = d3.forceSimulation() .nodes(data_set) .on("tick", ticked) .force("x", d3.forceX(width/2).strength(0.05)) // 移動先のx座標 .force("y", d3.forceY(height/2).strength(0.05)) // 移動先のy座標 .force("collide", d3.forceCollide(50)) ; - 今回は各要素の移動先のx座標をデータセットに入れます
// データセットのcol:移動先のx座標とします data_set = [{name:"aaa", val:58, col:100}, {name:"bbb", val:88, col:200}, {name:"ccc", val:48, col:300}, {name:"ddd", val:73, col:400}, {name:"eee", val:81, col:500}, {name:"fff", val:31, col:600} ] ; - d3.forceSimulationで各要素の移動先座標をデータセットから呼び出して設定します
var line_force = d3.forceSimulation() .nodes(data_set) .on("tick", ticked) .force("center", d3.forceCenter(width/2, height/2)) .force('charge', d3.forceManyBody().strength(5)) .force("collision", d3.forceCollide(40)) .force("x", d3.forceX().x(function(d){ return d.col; })) // 移動先のx座標 .force("y", d3.forceY().y(150)) // 移動先のy座標 ;
d3.forceCollide()/d3.forceManyBody()/d3.forceCenter()で動画効果の演出
- 今回の例では、各要素を中心から各自の配置場所に移動させるアニメーション効果を生み出しています
- d3.forceManyBody: 各要素間の引き合い効果
- d3.forceCollide:各要素を重なる具合の設定
- 今回の例ではそれぞれの移動先座標が決まっているので、この関数を利用しなくてもよい
- 今回はよりランダムのように各移動先に移動させるために使用しました
- d3.forceCenter: 各要素を指定した場所(x/y)に配置する
- 今回の例のコードは以下のようです
data_set = [{name:"aaa", val:58, col:100}, {name:"bbb", val:88, col:200}, {name:"ccc", val:48, col:300}, {name:"ddd", val:73, col:400}, {name:"eee", val:81, col:500}, {name:"fff", val:31, col:600} ] ; var width=600, height=300; var circles = d3.select("#content") .append("g") .selectAll("circle") .data(data_set) .enter() .append("circle") .attr("class","test-circle") .attr("r", function(d){ return d.val/2; }) .attr("fill","lightblue") ; var line_force = d3.forceSimulation() .nodes(data_set) .on("tick", ticked) .force("center", d3.forceCenter(width/2, height/2)) .force('charge', d3.forceManyBody().strength(5)) .force("collision", d3.forceCollide(40)) .force("x", d3.forceX().x(function(d){ return d.col; })) .force("y", d3.forceY().y(150)) ; function ticked(){ circles .attr("cx", function(d){ return d.x; }) .attr("cy", function(d){ return d.y; }) ; }
目的:簡単な例でd3.jsフォース(force)を利用します
- ここで、d3.js:V4を使用します(V3)のコーティング方法が大きく違うので、ご注意ください
- d3.jsのモジュール(force)に関する表現性が非常に高い例は数多く掲載されています
- ほとんどはソースのみで、説明が少ななく、わかりずらいです
- ここで、簡単の例を用いて、d3.jsのforceの動作を説明します
Step1:初期状態として複数の円をsvgで描画します
- svgで複数の円を描画します(円の中心座標:cx/cy=0)
var data_set = [ // 円の描画データ {name:"aaa", val:58}, {name:"bbb", val:88}, {name:"ccc", val:48}, {name:"ddd", val:73}, {name:"eee", val:81}, {name:"fff", val:31} ] ; // svgの描画範囲 var width=600, height=300; // 複数の円を描画 var circles = d3.select("#content") .append("g") .selectAll("circle") .data(data_set) .enter() .append( "circle" ) .attr( "class", "text-circle" ) .attr("r", function(d){return d.val/2}) .attr("fill", "lightblue") ; - 非常にシンプルな例なので、d3.jsので円描画の説明は省略します
Step2:force利用の第一歩:d3.forceSimulation作成
- モジュールforceを利用する最初の一歩はd3.forceSimulationを作成します
- 円を描画する配列もセットします
- tickイベントリスナーを実装します
- tickはd3のタイマーみたいのもので、force開始イベントとして利用します
- ここでtickイベントが来たら、描画された円を指定場所に移動させることにします
// forceSimulationの作成 var force = d3.forceSimulation() .nodes(data_set) .on("tick", ticked) ; // tickイベントリスナー function ticked(){ circles // 円を指定場所に移動させる .attr("cx", function(d){ return d.x; }) .attr("cy", function(d){ return d.y; }) ; }
- 結果は、描画された円が少し移動しました
Step3:d3.forceSimulationのメソッド(force)で円の移動先を指定
- d3.forceSimulationのメソッド(force)を利用して、X軸方向の中心に描画された円を移動させます
- メソッド(strength:力の大きさ)を利用して、円の移動速度/摩擦を調整します
- 0~1の範囲
- 0に近づければ重く、遅くなります、1に近づければ早く、軽くなります
var force = d3.forceSimulation() .nodes(data_set) .on("tick", ticked) .force("x", d3.forceX(width/2) // X軸の中心方向へ .strength(0.05) ) // 移動の速さ ;
- 同様にY軸の移行方向を指定できます
Step4:d3.forceCollideで円の描画範囲を広げる
- d3.forceCollideが纏まった複数の円の描画範囲を調整し、数字を大きくして全部表示できるようにします
var force = d3.forceSimulation() .nodes(data_set) .on("tick", ticked) .force("x", d3.forceX(width/2).strength(0.05)) .force("y", d3.forceY(height/2).strength(0.05)) .force("collide", d3.forceCollide(50)) // 円の描画範囲を広げる ; - これで、簡単のforce動作例が完成です
var data_set = [ {name:"aaa", val:58}, {name:"bbb", val:88}, {name:"ccc", val:48}, {name:"ddd", val:73}, {name:"eee", val:81}, {name:"fff", val:31} ] ; var width=600, height=300; var force = d3.forceSimulation() .nodes(data_set) .on("tick", ticked) .force("x", d3.forceX(width/2).strength(0.05)) .force("y", d3.forceY(height/2).strength(0.05)) .force("collide", d3.forceCollide(50)) ; function ticked(){ circles .attr("cx", function(d){ return d.x; }) .attr("cy", function(d){ return d.y; }) ; } var circles = d3.select("#content") .append("g") .selectAll("circle") .data(data_set) .enter() .append( "circle" ) .attr( "class", "text-circle" ) .attr("r", function(d){return d.val/2}) .attr("fill", "lightblue") ;
やりたいこと:オブジェクトが弾む効果の作成
- d3.forceLinkを使用します(d3.js v4)
- オブジェクト(例:玉)をドラッグして移動、ドロップしたら、決まった場所に弾むような効果
実現構想:d3.forceLinkのバネ効果を利用します
- 前回紹介した「d3.jsのフォース(force)を理解するための簡単な例4:バネのような伸縮効果再現できるd3.forceLink」 コードの元にします
- 決まった場所(例:四角内)にオブジェクト(例:玉)が弾む
- オブジェクトをドラッグして移動します
- オブジェクトをドロップしたら、オブジェクトが四角範囲内に弾みます
- 説明するため、簡単の二つのオブジェクトのデータセット、リンクセットをします
// オブジェクト:aaa、bbb data_set = [ {name:"aaa",fx:400,fy:200}, // fx/fyで配置場所に固定 {name:"bbb"} ] ; // オブジェクト:aaa、bbb の繋ぎリンクセット link_set = [ {source:"aaa", target:"bbb"} ];
ポイント1:d3.forceLinkにつなぐ一つノード(node)を固定します
- d3.forceLinkでつなぐオブジェクトがノード(node)と言います
- 一つノードにfx、fy、index、vx、vy、x、y要素があります
- fx/fyはノードを固定する座標を定義します
- nullの場合は固定しない
- 初期値:null
- 今回の例では最初にオブジェクト(aaa)をx:400,y:200に固定します
- もう一つオブジェクト(bbb)をaaaに重ねって表示させます
var line_force = d3.forceSimulation() .nodes(data_set) .on("tick", ticked) .force("link", d3.forceLink(link_set) .id(function(d){ return d.name ; }) .distance(0) // 重ねる表示のため、リンクの距離はゼロにする .strength(0.5)) .force('charge', d3.forceManyBody().strength(0.8)) .force("collision", d3.forceCollide(0)) // 重ねる表示のため、両オブジェクトの衝突距離はゼロにする ;
ポイント2:関数(datum())で固定しているオブジェクト(bbb)を決まった場所(四角)に再固定します
- オブジェクト(aaa)をドロップ時、オブジェクト(bbb)を決まった範囲(四角)に再固定すれば、オブジェクト(aaa)がd3.forceLinkの力で決まった範囲(四角)に弾むことになります
- オブジェクト(bbb)ノードにバインディングされたデータをアクセスするため、d3.select.datum()の出番です
// オブジェクト(aaa)をドロップ時の処理 function dragended(d) { if (!d3.event.active) line_force.alphaTarget(0); d.fx = null; d.fy = null; var a = d3.select(".circle-aaa") ; // オブジェクト(bbb)を取得 a.datum().fy=50; // 決まった範囲にxを再固定 a.datum().fx=400; // 決まった範囲にy再固定 } - プログラム全体は以下ようです
data_set = [ {name:"aaa",fx:400,fy:200}, {name:"bbb"} ] ; link_set = [ {source:"aaa", target:"bbb"}, ]; var width=600, height=300; d3.select("#content") .append("rect") .attr("x",380) .attr("y",30) .attr("width", 40) .attr("height",40) .attr('fill', 'rgba(0,0,0,0)') .attr('stroke', 'red') ; var force_g = d3.select("#content").append("g") ; var links = force_g.selectAll(".link") .data(link_set) .enter() .append("line") .attr("class", "link") .attr("stroke", "none") .attr("stroke-weight", 1) ; var circles = force_g.selectAll("circle") .data(data_set) .enter() .append("circle") .attr("class",function(d){ return "circle-"+d.name }) .attr("r", 15) .attr("fill","lightblue") .call(d3.drag() .on("start", dragstarted) .on("drag", dragged) .on("end", dragended) ) ; var line_force = d3.forceSimulation() .nodes(data_set) .on("tick", ticked) .force("link", d3.forceLink(link_set) .id(function(d){ return d.name ; }) .distance(0) .strength(0.5)) .force('charge', d3.forceManyBody().strength(0.8)) .force("collision", d3.forceCollide(0)) ; function dragstarted(d) { if (!d3.event.active) line_force.alphaTarget(0.9).restart(); d.fx = d.x; d.fy = d.y; } function dragged(d) { d.fx = d3.event.x; d.fy = d3.event.y; } function dragended(d) { if (!d3.event.active) line_force.alphaTarget(0); d.fx = null; d.fy = null; var a = d3.select(".circle-aaa") ; a.datum().fy=50; a.datum().fx=400; } function ticked(){ circles .attr("cx", function(d){ return d.x; }) .attr("cy", function(d){ return d.y; }) ; links .attr("x1", function(d) { return d.source.x; }) .attr("y1", function(d) { return d.source.y; }) .attr("x2", function(d) { return d.target.x; }) .attr("y2", function(d) { return d.target.y; }) ; }
d3.forceLinkがオブジェクト要素間のバネの伸縮効果の再現
- d3.forceにある一つ重要な要素d3.forceLinkよりバネの伸縮効果を生み出すことができます
- 特にドラッグ/ドロップ併合に使用すると、よりバネの伸縮効果の体験はできます
- d3.forceLinkはsvgのlineエレメントでLinkを描画します
- d3.forceSimulationのtickイベントより、動的にオブジェクト間の距離を計算しながら、lineを描画します
- d3.forceLinkのバネ効果の強さはcollision/charge/centerなどの要素の設定より調整されます
作成要点1:オブジェクト要素のリンク元(source)ターゲット先(target)設定
- 描画のオブジェクトデータセットを定義します
- オブジェクト間にリンクをつけるターゲット先にのデータセットを定義します
// 描画するオブジェクトのデータセット data_set = [{name:"aaa"}, {name:"bbb"}, {name:"ccc"}, {name:"ddd"}, {name:"eee"}, {name:"fff"} ] ; // オブジェクト間のリンク元とリンク先定義 link_set = [ {source:"aaa", target:"bbb"}, {source:"bbb", target:"ccc"}, {source:"ccc", target:"ddd"}, {source:"ddd", target:"eee"}, {source:"eee", target:"fff"}, {source:"fff", target:"aaa"}, ];- リンク元: sourceで定義
- リンク先: target で定義
- 「source」、「target」は決まりキーワード、変えることはできません
作成要点2:d3.forceSimulationでd3.forceLinkを定義
- d3.forceSimulationでforceのオブジェクト描画定義時にd3.forceLinkを定義します
var line_force = d3.forceSimulation() .nodes( data_set ) // オブジェクトのデータセット .on("tick", ticked) .force("link", d3.forceLink(link_set) // リンク元とリンク先のデータセット .id(function(d){ return d.name ; }) // オブジェクトデータセットにあるリンク要素フィールド設定 .distance(20) ) .force("center", d3.forceCenter(width/2, height/2)) .force('charge', d3.forceManyBody().strength(15)) .force("collision", d3.forceCollide(15)) // オブジェクトのぶつけ合い距離 ;- d3.forceLink().id()でのidがリンク元/先にのデータフィールド名を定義
作成要点3:d3.tickイベントのリスナーでリンクの描画要素(line)の始点/終了設定
- d3.forceの描画設定はd3.tickイベントリスナーの処理で実現します
- d3.forceLinkはsvgの要素(line)の始点/終点を定義して描画します
function ticked(){ circles .attr("cx", function(d){ return d.x; }) .attr("cy", function(d){ return d.y; }) ; links // svgのLineの始点/終点設定 .attr("x1", function(d) { return d.source.x; }) .attr("y1", function(d) { return d.source.y; }) .attr("x2", function(d) { return d.target.x; }) .attr("y2", function(d) { return d.target.y; }); } - 上記例の全コードは以下のようです
data_set = [ {name:"aaa"}, {name:"bbb"}, {name:"ccc"}, {name:"ddd"}, {name:"eee"}, {name:"fff"} ] ; link_set = [ {source:"aaa", target:"bbb"}, {source:"bbb", target:"ccc"}, {source:"ccc", target:"ddd"}, {source:"ddd", target:"eee"}, {source:"eee", target:"fff"}, {source:"fff", target:"aaa"}, ]; var width=600, height=300; var force_g = d3.select("#content").append("g") ; var links = force_g.selectAll(".link") .data(link_set) .enter() .append("line") .attr("class", "link") .attr("stroke", "#000") .attr("stroke-weight", 1) ; var circles = force_g.selectAll("circle") .data(data_set) .enter() .append("circle") .attr("class","test-circle") .attr("r", 5) .attr("fill","lightblue") .call(d3.drag() .on("start", dragstarted) .on("drag", dragged) .on("end", dragended) ) ; var line_force = d3.forceSimulation() .nodes(data_set) .on("tick", ticked) .force("link", d3.forceLink(link_set) .id(function(d){ return d.name ; }) .distance(20) ) .force("center", d3.forceCenter(width/2, height/2)) .force('charge', d3.forceManyBody().strength(15)) .force("collision", d3.forceCollide(15)) ; function dragstarted(d) { if (!d3.event.active) line_force.alphaTarget(0.9).restart(); d.fx = d.x; d.fy = d.y; } function dragged(d) { d.fx = d3.event.x; d.fy = d3.event.y; } function dragended(d) { if (!d3.event.active) line_force.alphaTarget(0); d.fx = null; d.fy = null; } function ticked(){ circles .attr("cx", function(d){ return d.x; }) .attr("cy", function(d){ return d.y; }) ; links .attr("x1", function(d) { return d.source.x; }) .attr("y1", function(d) { return d.source.y; }) .attr("x2", function(d) { return d.target.x; }) .attr("y2", function(d) { return d.target.y; }); }
d3.dragモジュールがオブジェクトのドラッグ、オブジェクト移動、ドロップを管理しています
- d3.dragモジュールはドラッグ、オブジェクト移動、ドロップについて、三つのイベントがあります
- start: ドラッグ開始
- drag: ドラッグしながら、オブジェクトの移動
- end: ドラッグ終了(ドロップ)
- この三つのイベントはブラウザのマウスイベントとタブレットのタッチイベントを対応しています。
- 以下のイベントの対応一覧(本家の紹介から)
Event Listening Element Drag Event Default Prevented? mousedown⁵ selection start no¹ mousemove² window¹ drag yes mouseup² window¹ end yes dragstart² window - yes selectstart² window - yes click³ window - yes touchstart selection start no⁴ touchmove selection drag yes touchend selection end no⁴ touchcancel selection end no⁴
- 以下のイベントの対応一覧(本家の紹介から)
d3.jsのイベント(start, drag, end)のキャッチと処理ロジックを作成すればドラッグ管理ができます
- この三つのイベント(start, drag, end)をキャッチして処理すれば簡単にd3.jsのドラッグ管理ができます
- 各オブジェクト(例:描画した円)に三つのイベント(start, drag, end)リスナーを実装します
var circles = force_g.selectAll("circle") .data(data_set) .enter() .append("circle") .attr("class","test-circle") .attr("r", function(d){ return d.val/2; }) .attr("fill","lightblue") .call(d3.drag() // ドラッグイベントリスナーの実装 .on("start", dragstarted) .on("drag", dragged) .on("end", dragended)); ; // 三つのイベント(start, drag, end)リスナー実装 function dragstarted(d) { if (!d3.event.active) line_force.alphaTarget(0.3).restart(); d.fx = d.x; d.fy = d.y; } function dragged(d) { d.fx = d3.event.x; d.fy = d3.event.y; } function dragended(d) { if (!d3.event.active) line_force.alphaTarget(0); d.fx = null; d.fy = null; } - 上記コードだけで、ドラッグ/ドロップ/オブジェクト移動ができます
data_set = [ {name:"aaa", val:58, col:100}, {name:"bbb", val:88, col:200}, {name:"ccc", val:48, col:300}, {name:"ddd", val:73, col:400}, {name:"eee", val:81, col:500}, {name:"fff", val:31, col:600} ] ; var width=600, height=300; var force_g = d3.select("#content") .append("g") ; var circles = force_g.selectAll("circle") .data(data_set) .enter() .append("circle") .attr("class","test-circle") .attr("r", function(d){ return d.val/2; }) .attr("fill","lightblue") .call(d3.drag() .on("start", dragstarted) .on("drag", dragged) .on("end", dragended)); ; var line_force = d3.forceSimulation() .nodes(data_set) .on("tick", ticked) .force("center", d3.forceCenter(width/2, height/2)) .force('charge', d3.forceManyBody().strength(5)) .force("collision", d3.forceCollide(function(d){return d.val/2;})) .force("y", d3.forceY().y(150)) ; function dragstarted(d) { if (!d3.event.active) line_force.alphaTarget(0.3).restart(); d.fx = d.x; d.fy = d.y; } function dragged(d) { d.fx = d3.event.x; d.fy = d3.event.y; } function dragended(d) { if (!d3.event.active) line_force.alphaTarget(0); d.fx = null; d.fy = null; } function ticked(){ circles .attr("cx", function(d){ return d.x; }) .attr("cy", function(d){ return d.y; }) ; }
d3のフォースレイアウト(fouce layout)で各要素を円形状態に配置するのはよく紹介されている
- 前回紹介いたした「d3.jsのフォース(force)を理解するための簡単な例 」でも円形状態に各要素を配置します
- ネットでd3のフォースレイアウトの例を調べてみると、大半も円形状に各要素を配置しています
- 時々、一直線に各要素を配置させることもあります
d3.fouceX関数を利用して、簡単に各要素を一直線に配置させます
- 前回の例ではd3.fouceX/d3.fouceYを利用して、各要素の移動先場所に指定します
var force = d3.forceSimulation() .nodes(data_set) .on("tick", ticked) .force("x", d3.forceX(width/2).strength(0.05)) // 移動先のx座標 .force("y", d3.forceY(height/2).strength(0.05)) // 移動先のy座標 .force("collide", d3.forceCollide(50)) ; - 今回は各要素の移動先のx座標をデータセットに入れます
// データセットのcol:移動先のx座標とします data_set = [{name:"aaa", val:58, col:100}, {name:"bbb", val:88, col:200}, {name:"ccc", val:48, col:300}, {name:"ddd", val:73, col:400}, {name:"eee", val:81, col:500}, {name:"fff", val:31, col:600} ] ; - d3.forceSimulationで各要素の移動先座標をデータセットから呼び出して設定します
var line_force = d3.forceSimulation() .nodes(data_set) .on("tick", ticked) .force("center", d3.forceCenter(width/2, height/2)) .force('charge', d3.forceManyBody().strength(5)) .force("collision", d3.forceCollide(40)) .force("x", d3.forceX().x(function(d){ return d.col; })) // 移動先のx座標 .force("y", d3.forceY().y(150)) // 移動先のy座標 ;
d3.forceCollide()/d3.forceManyBody()/d3.forceCenter()で動画効果の演出
- 今回の例では、各要素を中心から各自の配置場所に移動させるアニメーション効果を生み出しています
- d3.forceManyBody: 各要素間の引き合い効果
- d3.forceCollide:各要素を重なる具合の設定
- 今回の例ではそれぞれの移動先座標が決まっているので、この関数を利用しなくてもよい
- 今回はよりランダムのように各移動先に移動させるために使用しました
- d3.forceCenter: 各要素を指定した場所(x/y)に配置する
- 今回の例のコードは以下のようです
data_set = [{name:"aaa", val:58, col:100}, {name:"bbb", val:88, col:200}, {name:"ccc", val:48, col:300}, {name:"ddd", val:73, col:400}, {name:"eee", val:81, col:500}, {name:"fff", val:31, col:600} ] ; var width=600, height=300; var circles = d3.select("#content") .append("g") .selectAll("circle") .data(data_set) .enter() .append("circle") .attr("class","test-circle") .attr("r", function(d){ return d.val/2; }) .attr("fill","lightblue") ; var line_force = d3.forceSimulation() .nodes(data_set) .on("tick", ticked) .force("center", d3.forceCenter(width/2, height/2)) .force('charge', d3.forceManyBody().strength(5)) .force("collision", d3.forceCollide(40)) .force("x", d3.forceX().x(function(d){ return d.col; })) .force("y", d3.forceY().y(150)) ; function ticked(){ circles .attr("cx", function(d){ return d.x; }) .attr("cy", function(d){ return d.y; }) ; }
目的:簡単な例でd3.jsフォース(force)を利用します
- ここで、d3.js:V4を使用します(V3)のコーティング方法が大きく違うので、ご注意ください
- d3.jsのモジュール(force)に関する表現性が非常に高い例は数多く掲載されています
- ほとんどはソースのみで、説明が少ななく、わかりずらいです
- ここで、簡単の例を用いて、d3.jsのforceの動作を説明します
Step1:初期状態として複数の円をsvgで描画します
- svgで複数の円を描画します(円の中心座標:cx/cy=0)
var data_set = [ // 円の描画データ {name:"aaa", val:58}, {name:"bbb", val:88}, {name:"ccc", val:48}, {name:"ddd", val:73}, {name:"eee", val:81}, {name:"fff", val:31} ] ; // svgの描画範囲 var width=600, height=300; // 複数の円を描画 var circles = d3.select("#content") .append("g") .selectAll("circle") .data(data_set) .enter() .append( "circle" ) .attr( "class", "text-circle" ) .attr("r", function(d){return d.val/2}) .attr("fill", "lightblue") ; - 非常にシンプルな例なので、d3.jsので円描画の説明は省略します
Step2:force利用の第一歩:d3.forceSimulation作成
- モジュールforceを利用する最初の一歩はd3.forceSimulationを作成します
- 円を描画する配列もセットします
- tickイベントリスナーを実装します
- tickはd3のタイマーみたいのもので、force開始イベントとして利用します
- ここでtickイベントが来たら、描画された円を指定場所に移動させることにします
// forceSimulationの作成 var force = d3.forceSimulation() .nodes(data_set) .on("tick", ticked) ; // tickイベントリスナー function ticked(){ circles // 円を指定場所に移動させる .attr("cx", function(d){ return d.x; }) .attr("cy", function(d){ return d.y; }) ; }
- 結果は、描画された円が少し移動しました
Step3:d3.forceSimulationのメソッド(force)で円の移動先を指定
- d3.forceSimulationのメソッド(force)を利用して、X軸方向の中心に描画された円を移動させます
- メソッド(strength:力の大きさ)を利用して、円の移動速度/摩擦を調整します
- 0~1の範囲
- 0に近づければ重く、遅くなります、1に近づければ早く、軽くなります
var force = d3.forceSimulation() .nodes(data_set) .on("tick", ticked) .force("x", d3.forceX(width/2) // X軸の中心方向へ .strength(0.05) ) // 移動の速さ ;
- 同様にY軸の移行方向を指定できます
Step4:d3.forceCollideで円の描画範囲を広げる
- d3.forceCollideが纏まった複数の円の描画範囲を調整し、数字を大きくして全部表示できるようにします
var force = d3.forceSimulation() .nodes(data_set) .on("tick", ticked) .force("x", d3.forceX(width/2).strength(0.05)) .force("y", d3.forceY(height/2).strength(0.05)) .force("collide", d3.forceCollide(50)) // 円の描画範囲を広げる ; - これで、簡単のforce動作例が完成です
var data_set = [ {name:"aaa", val:58}, {name:"bbb", val:88}, {name:"ccc", val:48}, {name:"ddd", val:73}, {name:"eee", val:81}, {name:"fff", val:31} ] ; var width=600, height=300; var force = d3.forceSimulation() .nodes(data_set) .on("tick", ticked) .force("x", d3.forceX(width/2).strength(0.05)) .force("y", d3.forceY(height/2).strength(0.05)) .force("collide", d3.forceCollide(50)) ; function ticked(){ circles .attr("cx", function(d){ return d.x; }) .attr("cy", function(d){ return d.y; }) ; } var circles = d3.select("#content") .append("g") .selectAll("circle") .data(data_set) .enter() .append( "circle" ) .attr( "class", "text-circle" ) .attr("r", function(d){return d.val/2}) .attr("fill", "lightblue") ;
やりたいこと:オブジェクトが弾む効果の作成
- d3.forceLinkを使用します(d3.js v4)
- オブジェクト(例:玉)をドラッグして移動、ドロップしたら、決まった場所に弾むような効果
実現構想:d3.forceLinkのバネ効果を利用します
- 前回紹介した「d3.jsのフォース(force)を理解するための簡単な例4:バネのような伸縮効果再現できるd3.forceLink」 コードの元にします
- 決まった場所(例:四角内)にオブジェクト(例:玉)が弾む
- オブジェクトをドラッグして移動します
- オブジェクトをドロップしたら、オブジェクトが四角範囲内に弾みます
- 説明するため、簡単の二つのオブジェクトのデータセット、リンクセットをします
// オブジェクト:aaa、bbb data_set = [ {name:"aaa",fx:400,fy:200}, // fx/fyで配置場所に固定 {name:"bbb"} ] ; // オブジェクト:aaa、bbb の繋ぎリンクセット link_set = [ {source:"aaa", target:"bbb"} ];
ポイント1:d3.forceLinkにつなぐ一つノード(node)を固定します
- d3.forceLinkでつなぐオブジェクトがノード(node)と言います
- 一つノードにfx、fy、index、vx、vy、x、y要素があります
- fx/fyはノードを固定する座標を定義します
- nullの場合は固定しない
- 初期値:null
- 今回の例では最初にオブジェクト(aaa)をx:400,y:200に固定します
- もう一つオブジェクト(bbb)をaaaに重ねって表示させます
var line_force = d3.forceSimulation() .nodes(data_set) .on("tick", ticked) .force("link", d3.forceLink(link_set) .id(function(d){ return d.name ; }) .distance(0) // 重ねる表示のため、リンクの距離はゼロにする .strength(0.5)) .force('charge', d3.forceManyBody().strength(0.8)) .force("collision", d3.forceCollide(0)) // 重ねる表示のため、両オブジェクトの衝突距離はゼロにする ;
ポイント2:関数(datum())で固定しているオブジェクト(bbb)を決まった場所(四角)に再固定します
- オブジェクト(aaa)をドロップ時、オブジェクト(bbb)を決まった範囲(四角)に再固定すれば、オブジェクト(aaa)がd3.forceLinkの力で決まった範囲(四角)に弾むことになります
- オブジェクト(bbb)ノードにバインディングされたデータをアクセスするため、d3.select.datum()の出番です
// オブジェクト(aaa)をドロップ時の処理 function dragended(d) { if (!d3.event.active) line_force.alphaTarget(0); d.fx = null; d.fy = null; var a = d3.select(".circle-aaa") ; // オブジェクト(bbb)を取得 a.datum().fy=50; // 決まった範囲にxを再固定 a.datum().fx=400; // 決まった範囲にy再固定 } - プログラム全体は以下ようです
data_set = [ {name:"aaa",fx:400,fy:200}, {name:"bbb"} ] ; link_set = [ {source:"aaa", target:"bbb"}, ]; var width=600, height=300; d3.select("#content") .append("rect") .attr("x",380) .attr("y",30) .attr("width", 40) .attr("height",40) .attr('fill', 'rgba(0,0,0,0)') .attr('stroke', 'red') ; var force_g = d3.select("#content").append("g") ; var links = force_g.selectAll(".link") .data(link_set) .enter() .append("line") .attr("class", "link") .attr("stroke", "none") .attr("stroke-weight", 1) ; var circles = force_g.selectAll("circle") .data(data_set) .enter() .append("circle") .attr("class",function(d){ return "circle-"+d.name }) .attr("r", 15) .attr("fill","lightblue") .call(d3.drag() .on("start", dragstarted) .on("drag", dragged) .on("end", dragended) ) ; var line_force = d3.forceSimulation() .nodes(data_set) .on("tick", ticked) .force("link", d3.forceLink(link_set) .id(function(d){ return d.name ; }) .distance(0) .strength(0.5)) .force('charge', d3.forceManyBody().strength(0.8)) .force("collision", d3.forceCollide(0)) ; function dragstarted(d) { if (!d3.event.active) line_force.alphaTarget(0.9).restart(); d.fx = d.x; d.fy = d.y; } function dragged(d) { d.fx = d3.event.x; d.fy = d3.event.y; } function dragended(d) { if (!d3.event.active) line_force.alphaTarget(0); d.fx = null; d.fy = null; var a = d3.select(".circle-aaa") ; a.datum().fy=50; a.datum().fx=400; } function ticked(){ circles .attr("cx", function(d){ return d.x; }) .attr("cy", function(d){ return d.y; }) ; links .attr("x1", function(d) { return d.source.x; }) .attr("y1", function(d) { return d.source.y; }) .attr("x2", function(d) { return d.target.x; }) .attr("y2", function(d) { return d.target.y; }) ; }
d3.forceLinkがオブジェクト要素間のバネの伸縮効果の再現
- d3.forceにある一つ重要な要素d3.forceLinkよりバネの伸縮効果を生み出すことができます
- 特にドラッグ/ドロップ併合に使用すると、よりバネの伸縮効果の体験はできます
- d3.forceLinkはsvgのlineエレメントでLinkを描画します
- d3.forceSimulationのtickイベントより、動的にオブジェクト間の距離を計算しながら、lineを描画します
- d3.forceLinkのバネ効果の強さはcollision/charge/centerなどの要素の設定より調整されます
作成要点1:オブジェクト要素のリンク元(source)ターゲット先(target)設定
- 描画のオブジェクトデータセットを定義します
- オブジェクト間にリンクをつけるターゲット先にのデータセットを定義します
// 描画するオブジェクトのデータセット data_set = [{name:"aaa"}, {name:"bbb"}, {name:"ccc"}, {name:"ddd"}, {name:"eee"}, {name:"fff"} ] ; // オブジェクト間のリンク元とリンク先定義 link_set = [ {source:"aaa", target:"bbb"}, {source:"bbb", target:"ccc"}, {source:"ccc", target:"ddd"}, {source:"ddd", target:"eee"}, {source:"eee", target:"fff"}, {source:"fff", target:"aaa"}, ];- リンク元: sourceで定義
- リンク先: target で定義
- 「source」、「target」は決まりキーワード、変えることはできません
作成要点2:d3.forceSimulationでd3.forceLinkを定義
- d3.forceSimulationでforceのオブジェクト描画定義時にd3.forceLinkを定義します
var line_force = d3.forceSimulation() .nodes( data_set ) // オブジェクトのデータセット .on("tick", ticked) .force("link", d3.forceLink(link_set) // リンク元とリンク先のデータセット .id(function(d){ return d.name ; }) // オブジェクトデータセットにあるリンク要素フィールド設定 .distance(20) ) .force("center", d3.forceCenter(width/2, height/2)) .force('charge', d3.forceManyBody().strength(15)) .force("collision", d3.forceCollide(15)) // オブジェクトのぶつけ合い距離 ;- d3.forceLink().id()でのidがリンク元/先にのデータフィールド名を定義
作成要点3:d3.tickイベントのリスナーでリンクの描画要素(line)の始点/終了設定
- d3.forceの描画設定はd3.tickイベントリスナーの処理で実現します
- d3.forceLinkはsvgの要素(line)の始点/終点を定義して描画します
function ticked(){ circles .attr("cx", function(d){ return d.x; }) .attr("cy", function(d){ return d.y; }) ; links // svgのLineの始点/終点設定 .attr("x1", function(d) { return d.source.x; }) .attr("y1", function(d) { return d.source.y; }) .attr("x2", function(d) { return d.target.x; }) .attr("y2", function(d) { return d.target.y; }); } - 上記例の全コードは以下のようです
data_set = [ {name:"aaa"}, {name:"bbb"}, {name:"ccc"}, {name:"ddd"}, {name:"eee"}, {name:"fff"} ] ; link_set = [ {source:"aaa", target:"bbb"}, {source:"bbb", target:"ccc"}, {source:"ccc", target:"ddd"}, {source:"ddd", target:"eee"}, {source:"eee", target:"fff"}, {source:"fff", target:"aaa"}, ]; var width=600, height=300; var force_g = d3.select("#content").append("g") ; var links = force_g.selectAll(".link") .data(link_set) .enter() .append("line") .attr("class", "link") .attr("stroke", "#000") .attr("stroke-weight", 1) ; var circles = force_g.selectAll("circle") .data(data_set) .enter() .append("circle") .attr("class","test-circle") .attr("r", 5) .attr("fill","lightblue") .call(d3.drag() .on("start", dragstarted) .on("drag", dragged) .on("end", dragended) ) ; var line_force = d3.forceSimulation() .nodes(data_set) .on("tick", ticked) .force("link", d3.forceLink(link_set) .id(function(d){ return d.name ; }) .distance(20) ) .force("center", d3.forceCenter(width/2, height/2)) .force('charge', d3.forceManyBody().strength(15)) .force("collision", d3.forceCollide(15)) ; function dragstarted(d) { if (!d3.event.active) line_force.alphaTarget(0.9).restart(); d.fx = d.x; d.fy = d.y; } function dragged(d) { d.fx = d3.event.x; d.fy = d3.event.y; } function dragended(d) { if (!d3.event.active) line_force.alphaTarget(0); d.fx = null; d.fy = null; } function ticked(){ circles .attr("cx", function(d){ return d.x; }) .attr("cy", function(d){ return d.y; }) ; links .attr("x1", function(d) { return d.source.x; }) .attr("y1", function(d) { return d.source.y; }) .attr("x2", function(d) { return d.target.x; }) .attr("y2", function(d) { return d.target.y; }); }
