WordPressの投稿/固定ページにGoogleMap挿入の簡単方法:GoogleMapのiframeコードの埋込
WordPressの投稿/固定ページにGoogleMapを挿入する簡単な方法:指定した場所のGoogleMapのifremeコードの取得
- GoogleMapが「地図を向けこむ」を提供しています
- Googleマップで表示したい場所を絞り込みます
- 表示したい場所を指定(マウスが右クリックすると「この場所について」メニューがあらわれ」)します
- Googleマップのメニューから「共有または地図を埋め込む」を選択し、表示された場所のiframeコードをコピーします

- WordPressの投稿/固定ページの編集エリアにGoogleMapのiframeコードをペストします
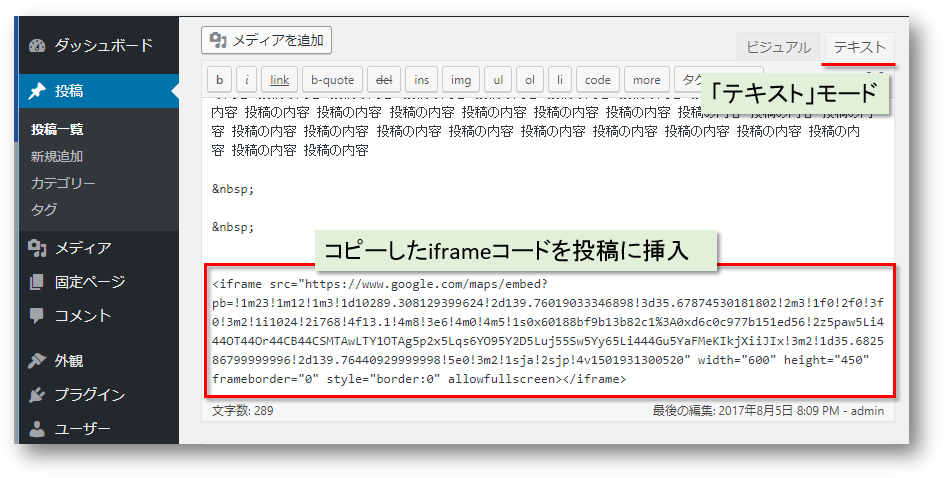
- 投稿の編集もーとが「テキスト」にします
短所:GoogleMapの頻繁の利用に向かない、投稿リスト/詳細にマップが表示されてしまいます
- 毎回GoogleMapからiframeの取得する必要がありますので、頻繁の利用に面倒な操作です
- 挿入した投稿の詳細画面と投稿一覧画面にマップが表示されてしまいます(例:詳細画面のみの表示ができない)


WordPressのプラグイン(ACF:Advanced Custom Fields)投稿/固定ページにGoogleMapを挿入する
- GoogleMapを投稿/固定ページに挿入する簡単な方法を前回紹介しました(WordPressの投稿/固定ページにGoogleMap挿入の簡単方法:GoogleMapのiframeコードの埋込 )
- 今回はプラグイン(ACF)でGoogleMap挿入方法を紹介します
- プラグイン(ACF)のインストール/有効化します
- 管理メニューに「カスタムフィールド」が現れます
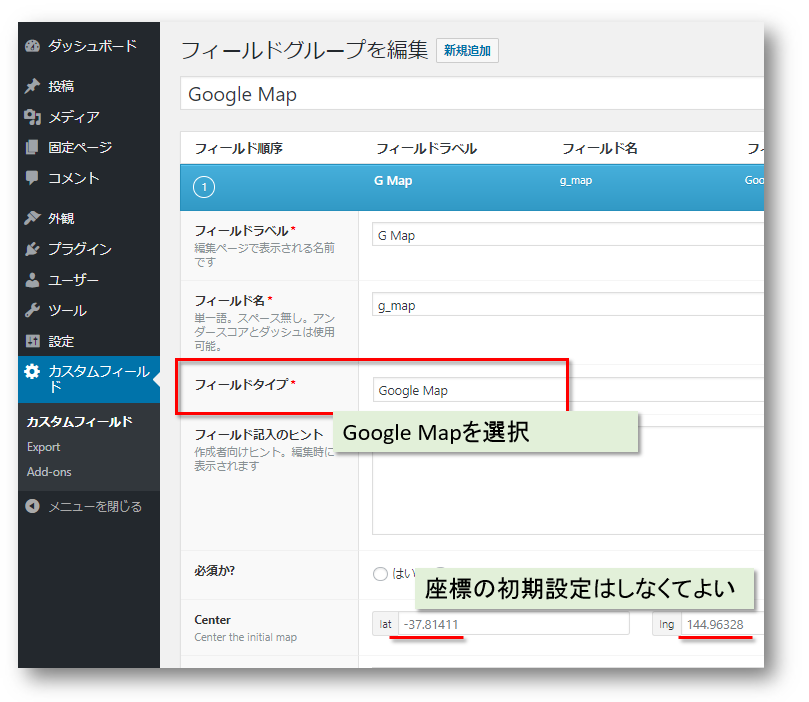
- 「カスタムフィールド」で「新規追加」ボタンを押して、新しいフィールドグループを作成します
- グループ名: Google Map
- フィールドラベル: G Map
- フィールド名: g_map (自動生成され)
- 新規投稿を作成します
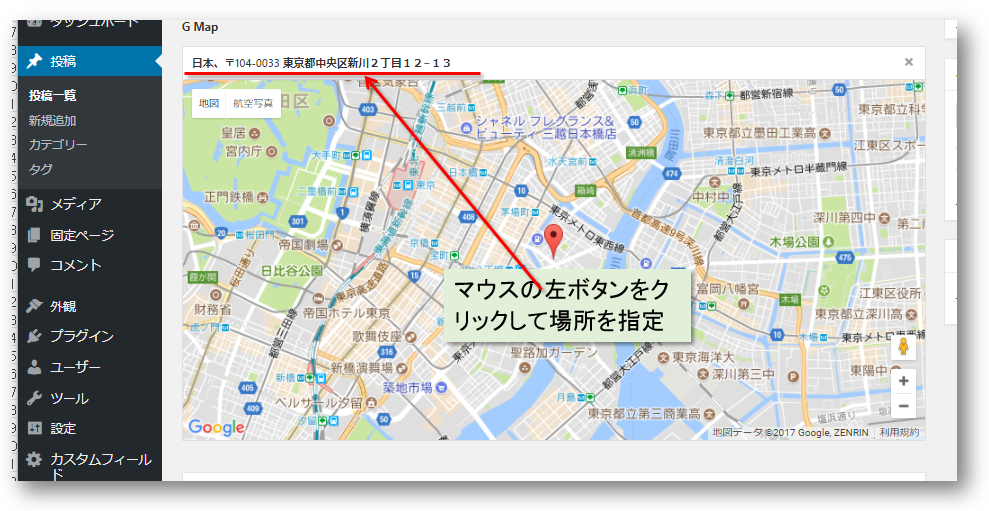
- 投稿編集エリアの下にACFのカスタムフィールド(Google Map)が現れます
- Google Mapを表示したい場所に絞り込みます
- マウスの右ボタンをクリックして、表示したい場所をしています
- 投稿の編集エリアにACFのGoogleMap値を出力します
// カスタムタグでACF値の出力
[acf field="g_map"]
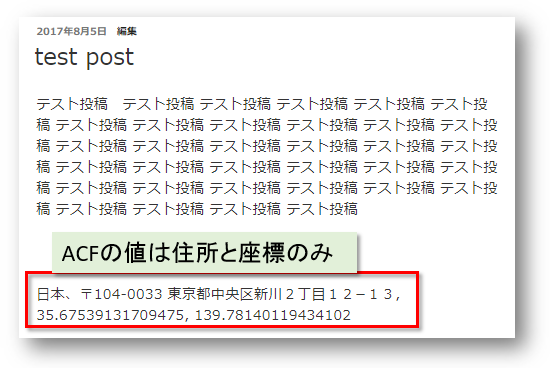
- 投稿一覧/詳細画面にGoogleMap上で指定した場所の住所、座標が表示されます
プラグイン(ACF)のGoogleMapフィールドがgeoフィールドなので、GoogleMapで値を表示するために別のツールが必要です
- 投稿のコンテンツにACFのGoogleMapフィールドの値は住所、座標だけでした
- GoogleMapでその座標を表示させるには、別のツールが必要となります
- 表示方法がいろいろありますが、ここでは本家で説明した方法:javascriptでの表示方法を紹介します
- GoogleからGMapAPIの利用キーを取得します(メモに保存)
- GoogleMapを表示させるAPIのキーをfunction.phpに挿入します
function my_acf_google_map_api( $api ){ $api['key'] = 'xxx'; // GMap APIのキーで書き換え return $api; } add_filter('acf/fields/google_map/api', 'my_acf_google_map_api'); - GoogleMapを表示させるcssとjavascriptをコピーして、single.phpテンプレートに挿入します
<style type="text/css"> .acf-map { width: 100%; height: 400px; border: #ccc solid 1px; margin: 20px 0; } /* fixes potential theme css conflict */ .acf-map img { max-width: inherit !important; } </style> <script src="https://maps.googleapis.com/maps/api/js?key=YOUR_API_KEY"></script> // GMapAPIのキーで書き換え <script type="text/javascript"> (function($) { /* * new_map * * This function will render a Google Map onto the selected jQuery element * * @type function * @date 8/11/2013 * @since 4.3.0 * * @param $el (jQuery element) * @return n/a */ function new_map( $el ) { // var var $markers = $el.find('.marker'); // vars var args = { zoom : 16, center : new google.maps.LatLng(0, 0), mapTypeId : google.maps.MapTypeId.ROADMAP }; // create map var map = new google.maps.Map( $el[0], args); // add a markers reference map.markers = []; // add markers $markers.each(function(){ add_marker( $(this), map ); }); // center map center_map( map ); // return return map; } /* * add_marker * * This function will add a marker to the selected Google Map * * @type function * @date 8/11/2013 * @since 4.3.0 * * @param $marker (jQuery element) * @param map (Google Map object) * @return n/a */ function add_marker( $marker, map ) { // var var latlng = new google.maps.LatLng( $marker.attr('data-lat'), $marker.attr('data-lng') ); // create marker var marker = new google.maps.Marker({ position : latlng, map : map }); // add to array map.markers.push( marker ); // if marker contains HTML, add it to an infoWindow if( $marker.html() ) { // create info window var infowindow = new google.maps.InfoWindow({ content : $marker.html() }); // show info window when marker is clicked google.maps.event.addListener(marker, 'click', function() { infowindow.open( map, marker ); }); } } /* * center_map * * This function will center the map, showing all markers attached to this map * * @type function * @date 8/11/2013 * @since 4.3.0 * * @param map (Google Map object) * @return n/a */ function center_map( map ) { // vars var bounds = new google.maps.LatLngBounds(); // loop through all markers and create bounds $.each( map.markers, function( i, marker ){ var latlng = new google.maps.LatLng( marker.position.lat(), marker.position.lng() ); bounds.extend( latlng ); }); // only 1 marker? if( map.markers.length == 1 ) { // set center of map map.setCenter( bounds.getCenter() ); map.setZoom( 16 ); } else { // fit to bounds map.fitBounds( bounds ); } } /* * document ready * * This function will render each map when the document is ready (page has loaded) * * @type function * @date 8/11/2013 * @since 5.0.0 * * @param n/a * @return n/a */ // global var var map = null; $(document).ready(function(){ $('.acf-map').each(function(){ // create map map = new_map( $(this) ); }); }); })(jQuery); </script> - 指定した場所のGoogleMapを投稿のコンテンツに挿入します(場所は好きなところで)
<?php

$location = get_field('g_map');  // ACFのGoogleMapフィールド名

if( !empty($location) ):
?>
<div class="acf-map">
	<div class="marker" data-lat="<?php echo $location['lat']; ?>" data-lng="<?php echo $location['lng']; ?>"></div>
</div>
<?php endif; ?>
長所:頻繁使用に場所の指定が簡単。短所:テンプレートの変更が必要
- ACFでGoogleMapの利用は、各投稿/固定ページの編集時に、簡単にマップ上で場所指定ができます(頻繁の使用には有利)
- テンプレート変更が必要で、ソースコードの乱れがあります
- 投稿/固定ページのコンテンツに表示場所を変更するには面倒です
- 表示場所を変更すると、以前の記事/固定ページにも影響を与えます

WordPressの投稿/固定ページにGoogleMapを挿入する簡単な方法:指定した場所のGoogleMapのifremeコードの取得
- GoogleMapが「地図を向けこむ」を提供しています
- Googleマップで表示したい場所を絞り込みます
- 表示したい場所を指定(マウスが右クリックすると「この場所について」メニューがあらわれ」)します
- Googleマップのメニューから「共有または地図を埋め込む」を選択し、表示された場所のiframeコードをコピーします
- WordPressの投稿/固定ページの編集エリアにGoogleMapのiframeコードをペストします
- 投稿の編集もーとが「テキスト」にします
短所:GoogleMapの頻繁の利用に向かない、投稿リスト/詳細にマップが表示されてしまいます
- 毎回GoogleMapからiframeの取得する必要がありますので、頻繁の利用に面倒な操作です
- 挿入した投稿の詳細画面と投稿一覧画面にマップが表示されてしまいます(例:詳細画面のみの表示ができない)
WordPressのプラグイン(ACF:Advanced Custom Fields)投稿/固定ページにGoogleMapを挿入する
- GoogleMapを投稿/固定ページに挿入する簡単な方法を前回紹介しました(WordPressの投稿/固定ページにGoogleMap挿入の簡単方法:GoogleMapのiframeコードの埋込 )
- 今回はプラグイン(ACF)でGoogleMap挿入方法を紹介します
- プラグイン(ACF)のインストール/有効化します
- 管理メニューに「カスタムフィールド」が現れます
- 「カスタムフィールド」で「新規追加」ボタンを押して、新しいフィールドグループを作成します
- グループ名: Google Map
- フィールドラベル: G Map
- フィールド名: g_map (自動生成され)
- 新規投稿を作成します
- 投稿編集エリアの下にACFのカスタムフィールド(Google Map)が現れます
- Google Mapを表示したい場所に絞り込みます
- マウスの右ボタンをクリックして、表示したい場所をしています
- 投稿の編集エリアにACFのGoogleMap値を出力します
// カスタムタグでACF値の出力
[acf field="g_map"]
- 投稿一覧/詳細画面にGoogleMap上で指定した場所の住所、座標が表示されます
プラグイン(ACF)のGoogleMapフィールドがgeoフィールドなので、GoogleMapで値を表示するために別のツールが必要です
- 投稿のコンテンツにACFのGoogleMapフィールドの値は住所、座標だけでした
- GoogleMapでその座標を表示させるには、別のツールが必要となります
- 表示方法がいろいろありますが、ここでは本家で説明した方法:javascriptでの表示方法を紹介します
- GoogleからGMapAPIの利用キーを取得します(メモに保存)
- GoogleMapを表示させるAPIのキーをfunction.phpに挿入します
function my_acf_google_map_api( $api ){ $api['key'] = 'xxx'; // GMap APIのキーで書き換え return $api; } add_filter('acf/fields/google_map/api', 'my_acf_google_map_api'); - GoogleMapを表示させるcssとjavascriptをコピーして、single.phpテンプレートに挿入します
<style type="text/css"> .acf-map { width: 100%; height: 400px; border: #ccc solid 1px; margin: 20px 0; } /* fixes potential theme css conflict */ .acf-map img { max-width: inherit !important; } </style> <script src="https://maps.googleapis.com/maps/api/js?key=YOUR_API_KEY"></script> // GMapAPIのキーで書き換え <script type="text/javascript"> (function($) { /* * new_map * * This function will render a Google Map onto the selected jQuery element * * @type function * @date 8/11/2013 * @since 4.3.0 * * @param $el (jQuery element) * @return n/a */ function new_map( $el ) { // var var $markers = $el.find('.marker'); // vars var args = { zoom : 16, center : new google.maps.LatLng(0, 0), mapTypeId : google.maps.MapTypeId.ROADMAP }; // create map var map = new google.maps.Map( $el[0], args); // add a markers reference map.markers = []; // add markers $markers.each(function(){ add_marker( $(this), map ); }); // center map center_map( map ); // return return map; } /* * add_marker * * This function will add a marker to the selected Google Map * * @type function * @date 8/11/2013 * @since 4.3.0 * * @param $marker (jQuery element) * @param map (Google Map object) * @return n/a */ function add_marker( $marker, map ) { // var var latlng = new google.maps.LatLng( $marker.attr('data-lat'), $marker.attr('data-lng') ); // create marker var marker = new google.maps.Marker({ position : latlng, map : map }); // add to array map.markers.push( marker ); // if marker contains HTML, add it to an infoWindow if( $marker.html() ) { // create info window var infowindow = new google.maps.InfoWindow({ content : $marker.html() }); // show info window when marker is clicked google.maps.event.addListener(marker, 'click', function() { infowindow.open( map, marker ); }); } } /* * center_map * * This function will center the map, showing all markers attached to this map * * @type function * @date 8/11/2013 * @since 4.3.0 * * @param map (Google Map object) * @return n/a */ function center_map( map ) { // vars var bounds = new google.maps.LatLngBounds(); // loop through all markers and create bounds $.each( map.markers, function( i, marker ){ var latlng = new google.maps.LatLng( marker.position.lat(), marker.position.lng() ); bounds.extend( latlng ); }); // only 1 marker? if( map.markers.length == 1 ) { // set center of map map.setCenter( bounds.getCenter() ); map.setZoom( 16 ); } else { // fit to bounds map.fitBounds( bounds ); } } /* * document ready * * This function will render each map when the document is ready (page has loaded) * * @type function * @date 8/11/2013 * @since 5.0.0 * * @param n/a * @return n/a */ // global var var map = null; $(document).ready(function(){ $('.acf-map').each(function(){ // create map map = new_map( $(this) ); }); }); })(jQuery); </script> - 指定した場所のGoogleMapを投稿のコンテンツに挿入します(場所は好きなところで)
<?php

$location = get_field('g_map');  // ACFのGoogleMapフィールド名

if( !empty($location) ):
?>
<div class="acf-map">
	<div class="marker" data-lat="<?php echo $location['lat']; ?>" data-lng="<?php echo $location['lng']; ?>"></div>
</div>
<?php endif; ?>
長所:頻繁使用に場所の指定が簡単。短所:テンプレートの変更が必要
- ACFでGoogleMapの利用は、各投稿/固定ページの編集時に、簡単にマップ上で場所指定ができます(頻繁の使用には有利)
- テンプレート変更が必要で、ソースコードの乱れがあります
- 投稿/固定ページのコンテンツに表示場所を変更するには面倒です
- 表示場所を変更すると、以前の記事/固定ページにも影響を与えます
GoogleMapを固定ページ/投稿に挿入する方法がいろいろあります
- Google Mapを固定ページ/投稿に挿入方法をいろいろ紹介しました
- 上記方法が長所、短所がいろいろあります。どれを利用するかは使用目的に合わせて決めたほうが良いでしょう
Google Mapを固定ページ/投稿に挿入する専用プラグイン(MapPress Easy Google Map)の導入
- Google Mapを扱う専用プラグインが数多くあります(すべての試用したことがはないですが、気に入ったものを紹介します)
- Google Mapをキーワードでプラグインを検索すると、いろいろができます
- WP Google Mapの利用者数が非常に多いですが、試用してみたが頻繁に違う場所を表示したい場合にあまり向かないと感じました(管理画面で複数の固定マップを作成し、ページ/投稿に挿入)
- 使いやすプラグイン(MapPress Easy Google Map)を紹介します(頻繁に違う場所表示に向いています)
- MapPress Easy Google Mapをダウンロード、有効化します
- 管理メニューから「MapPress」リンクが現れ、それを選択します
- MapPress管理画面でGoogle API Keyを登録します
- 他のオプションは初期設定のままで良いでしょう
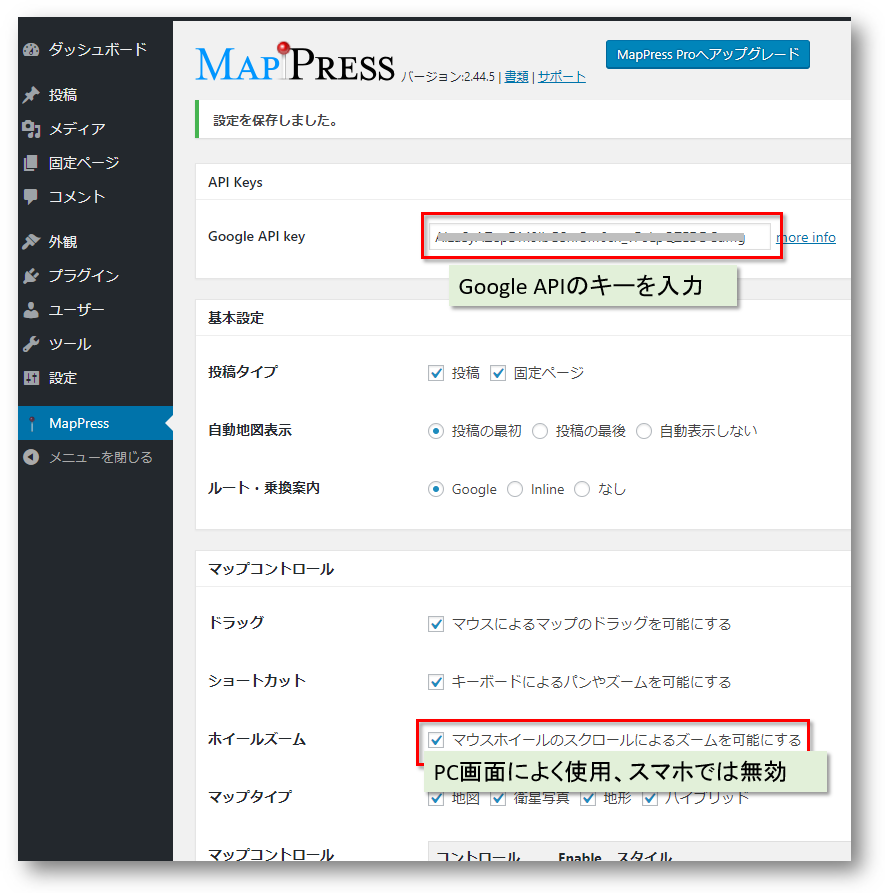
- 投稿/固定ページの編集画面の下にMapPressのMap作成ボタンがあります
- 必要に応じ、マップを作成します
- POIフィールドに住所(詳細な住所ではなくてよい)を入力して表示場所を絞り込みます
- マップ上のマーカーをドラッグ/ドロップで表示させたい場所に移動します
- マップを一度保存して、ショットコードを投稿に挿入します

- PCのブラウザでよく使用しているマウスホイール・ズーム機能をMapPressの管理画面で有効にすることができます
プラグイン(MapPress Easy Google Map)が簡単に利用でき、かつ頻繁に違う場所の表示に良いツールでしょう
- いろいろなツール/プラグインなどを試用してきましたが、それぞれ短所・長所があります。
- プラグイン(MapPress Easy Google Map)が比較的に、簡単に利用でき、かつ頻繁に違う場所の指定に良いツールだと感じています
WordPressの投稿/固定ページにGoogleMapを挿入する簡単な方法:指定した場所のGoogleMapのifremeコードの取得
- GoogleMapが「地図を向けこむ」を提供しています
- Googleマップで表示したい場所を絞り込みます
- 表示したい場所を指定(マウスが右クリックすると「この場所について」メニューがあらわれ」)します
- Googleマップのメニューから「共有または地図を埋め込む」を選択し、表示された場所のiframeコードをコピーします
- WordPressの投稿/固定ページの編集エリアにGoogleMapのiframeコードをペストします
- 投稿の編集もーとが「テキスト」にします
短所:GoogleMapの頻繁の利用に向かない、投稿リスト/詳細にマップが表示されてしまいます
- 毎回GoogleMapからiframeの取得する必要がありますので、頻繁の利用に面倒な操作です
- 挿入した投稿の詳細画面と投稿一覧画面にマップが表示されてしまいます(例:詳細画面のみの表示ができない)
WordPressのプラグイン(ACF:Advanced Custom Fields)投稿/固定ページにGoogleMapを挿入する
- GoogleMapを投稿/固定ページに挿入する簡単な方法を前回紹介しました(WordPressの投稿/固定ページにGoogleMap挿入の簡単方法:GoogleMapのiframeコードの埋込 )
- 今回はプラグイン(ACF)でGoogleMap挿入方法を紹介します
- プラグイン(ACF)のインストール/有効化します
- 管理メニューに「カスタムフィールド」が現れます
- 「カスタムフィールド」で「新規追加」ボタンを押して、新しいフィールドグループを作成します
- グループ名: Google Map
- フィールドラベル: G Map
- フィールド名: g_map (自動生成され)
- 新規投稿を作成します
- 投稿編集エリアの下にACFのカスタムフィールド(Google Map)が現れます
- Google Mapを表示したい場所に絞り込みます
- マウスの右ボタンをクリックして、表示したい場所をしています
- 投稿の編集エリアにACFのGoogleMap値を出力します
// カスタムタグでACF値の出力
[acf field="g_map"]
- 投稿一覧/詳細画面にGoogleMap上で指定した場所の住所、座標が表示されます
プラグイン(ACF)のGoogleMapフィールドがgeoフィールドなので、GoogleMapで値を表示するために別のツールが必要です
- 投稿のコンテンツにACFのGoogleMapフィールドの値は住所、座標だけでした
- GoogleMapでその座標を表示させるには、別のツールが必要となります
- 表示方法がいろいろありますが、ここでは本家で説明した方法:javascriptでの表示方法を紹介します
- GoogleからGMapAPIの利用キーを取得します(メモに保存)
- GoogleMapを表示させるAPIのキーをfunction.phpに挿入します
function my_acf_google_map_api( $api ){ $api['key'] = 'xxx'; // GMap APIのキーで書き換え return $api; } add_filter('acf/fields/google_map/api', 'my_acf_google_map_api'); - GoogleMapを表示させるcssとjavascriptをコピーして、single.phpテンプレートに挿入します
<style type="text/css"> .acf-map { width: 100%; height: 400px; border: #ccc solid 1px; margin: 20px 0; } /* fixes potential theme css conflict */ .acf-map img { max-width: inherit !important; } </style> <script src="https://maps.googleapis.com/maps/api/js?key=YOUR_API_KEY"></script> // GMapAPIのキーで書き換え <script type="text/javascript"> (function($) { /* * new_map * * This function will render a Google Map onto the selected jQuery element * * @type function * @date 8/11/2013 * @since 4.3.0 * * @param $el (jQuery element) * @return n/a */ function new_map( $el ) { // var var $markers = $el.find('.marker'); // vars var args = { zoom : 16, center : new google.maps.LatLng(0, 0), mapTypeId : google.maps.MapTypeId.ROADMAP }; // create map var map = new google.maps.Map( $el[0], args); // add a markers reference map.markers = []; // add markers $markers.each(function(){ add_marker( $(this), map ); }); // center map center_map( map ); // return return map; } /* * add_marker * * This function will add a marker to the selected Google Map * * @type function * @date 8/11/2013 * @since 4.3.0 * * @param $marker (jQuery element) * @param map (Google Map object) * @return n/a */ function add_marker( $marker, map ) { // var var latlng = new google.maps.LatLng( $marker.attr('data-lat'), $marker.attr('data-lng') ); // create marker var marker = new google.maps.Marker({ position : latlng, map : map }); // add to array map.markers.push( marker ); // if marker contains HTML, add it to an infoWindow if( $marker.html() ) { // create info window var infowindow = new google.maps.InfoWindow({ content : $marker.html() }); // show info window when marker is clicked google.maps.event.addListener(marker, 'click', function() { infowindow.open( map, marker ); }); } } /* * center_map * * This function will center the map, showing all markers attached to this map * * @type function * @date 8/11/2013 * @since 4.3.0 * * @param map (Google Map object) * @return n/a */ function center_map( map ) { // vars var bounds = new google.maps.LatLngBounds(); // loop through all markers and create bounds $.each( map.markers, function( i, marker ){ var latlng = new google.maps.LatLng( marker.position.lat(), marker.position.lng() ); bounds.extend( latlng ); }); // only 1 marker? if( map.markers.length == 1 ) { // set center of map map.setCenter( bounds.getCenter() ); map.setZoom( 16 ); } else { // fit to bounds map.fitBounds( bounds ); } } /* * document ready * * This function will render each map when the document is ready (page has loaded) * * @type function * @date 8/11/2013 * @since 5.0.0 * * @param n/a * @return n/a */ // global var var map = null; $(document).ready(function(){ $('.acf-map').each(function(){ // create map map = new_map( $(this) ); }); }); })(jQuery); </script> - 指定した場所のGoogleMapを投稿のコンテンツに挿入します(場所は好きなところで)
<?php

$location = get_field('g_map');  // ACFのGoogleMapフィールド名

if( !empty($location) ):
?>
<div class="acf-map">
	<div class="marker" data-lat="<?php echo $location['lat']; ?>" data-lng="<?php echo $location['lng']; ?>"></div>
</div>
<?php endif; ?>
長所:頻繁使用に場所の指定が簡単。短所:テンプレートの変更が必要
- ACFでGoogleMapの利用は、各投稿/固定ページの編集時に、簡単にマップ上で場所指定ができます(頻繁の使用には有利)
- テンプレート変更が必要で、ソースコードの乱れがあります
- 投稿/固定ページのコンテンツに表示場所を変更するには面倒です
- 表示場所を変更すると、以前の記事/固定ページにも影響を与えます
GoogleMapを固定ページ/投稿に挿入する方法がいろいろあります
- Google Mapを固定ページ/投稿に挿入方法をいろいろ紹介しました
- 上記方法が長所、短所がいろいろあります。どれを利用するかは使用目的に合わせて決めたほうが良いでしょう
Google Mapを固定ページ/投稿に挿入する専用プラグイン(MapPress Easy Google Map)の導入
- Google Mapを扱う専用プラグインが数多くあります(すべての試用したことがはないですが、気に入ったものを紹介します)
- Google Mapをキーワードでプラグインを検索すると、いろいろができます
- WP Google Mapの利用者数が非常に多いですが、試用してみたが頻繁に違う場所を表示したい場合にあまり向かないと感じました(管理画面で複数の固定マップを作成し、ページ/投稿に挿入)
- 使いやすプラグイン(MapPress Easy Google Map)を紹介します(頻繁に違う場所表示に向いています)
- MapPress Easy Google Mapをダウンロード、有効化します
- 管理メニューから「MapPress」リンクが現れ、それを選択します
- MapPress管理画面でGoogle API Keyを登録します
- 他のオプションは初期設定のままで良いでしょう
- 投稿/固定ページの編集画面の下にMapPressのMap作成ボタンがあります
- 必要に応じ、マップを作成します
- POIフィールドに住所(詳細な住所ではなくてよい)を入力して表示場所を絞り込みます
- マップ上のマーカーをドラッグ/ドロップで表示させたい場所に移動します
- マップを一度保存して、ショットコードを投稿に挿入します
- PCのブラウザでよく使用しているマウスホイール・ズーム機能をMapPressの管理画面で有効にすることができます
プラグイン(MapPress Easy Google Map)が簡単に利用でき、かつ頻繁に違う場所の表示に良いツールでしょう
- いろいろなツール/プラグインなどを試用してきましたが、それぞれ短所・長所があります。
- プラグイン(MapPress Easy Google Map)が比較的に、簡単に利用でき、かつ頻繁に違う場所の指定に良いツールだと感じています
WordPressの投稿/固定ページにGoogleMapを挿入する簡単な方法:指定した場所のGoogleMapのifremeコードの取得
- GoogleMapが「地図を向けこむ」を提供しています
- Googleマップで表示したい場所を絞り込みます
- 表示したい場所を指定(マウスが右クリックすると「この場所について」メニューがあらわれ」)します
- Googleマップのメニューから「共有または地図を埋め込む」を選択し、表示された場所のiframeコードをコピーします
- WordPressの投稿/固定ページの編集エリアにGoogleMapのiframeコードをペストします
- 投稿の編集もーとが「テキスト」にします
短所:GoogleMapの頻繁の利用に向かない、投稿リスト/詳細にマップが表示されてしまいます
- 毎回GoogleMapからiframeの取得する必要がありますので、頻繁の利用に面倒な操作です
- 挿入した投稿の詳細画面と投稿一覧画面にマップが表示されてしまいます(例:詳細画面のみの表示ができない)
WordPressのプラグイン(ACF:Advanced Custom Fields)投稿/固定ページにGoogleMapを挿入する
- GoogleMapを投稿/固定ページに挿入する簡単な方法を前回紹介しました(WordPressの投稿/固定ページにGoogleMap挿入の簡単方法:GoogleMapのiframeコードの埋込 )
- 今回はプラグイン(ACF)でGoogleMap挿入方法を紹介します
- プラグイン(ACF)のインストール/有効化します
- 管理メニューに「カスタムフィールド」が現れます
- 「カスタムフィールド」で「新規追加」ボタンを押して、新しいフィールドグループを作成します
- グループ名: Google Map
- フィールドラベル: G Map
- フィールド名: g_map (自動生成され)
- 新規投稿を作成します
- 投稿編集エリアの下にACFのカスタムフィールド(Google Map)が現れます
- Google Mapを表示したい場所に絞り込みます
- マウスの右ボタンをクリックして、表示したい場所をしています
- 投稿の編集エリアにACFのGoogleMap値を出力します
// カスタムタグでACF値の出力 [acf field="g_map"]
- 投稿一覧/詳細画面にGoogleMap上で指定した場所の住所、座標が表示されます
プラグイン(ACF)のGoogleMapフィールドがgeoフィールドなので、GoogleMapで値を表示するために別のツールが必要です
- 投稿のコンテンツにACFのGoogleMapフィールドの値は住所、座標だけでした
- GoogleMapでその座標を表示させるには、別のツールが必要となります
- 表示方法がいろいろありますが、ここでは本家で説明した方法:javascriptでの表示方法を紹介します
- GoogleからGMapAPIの利用キーを取得します(メモに保存)
- GoogleMapを表示させるAPIのキーをfunction.phpに挿入します
function my_acf_google_map_api( $api ){ $api['key'] = 'xxx'; // GMap APIのキーで書き換え return $api; } add_filter('acf/fields/google_map/api', 'my_acf_google_map_api'); - GoogleMapを表示させるcssとjavascriptをコピーして、single.phpテンプレートに挿入します
<style type="text/css"> .acf-map { width: 100%; height: 400px; border: #ccc solid 1px; margin: 20px 0; } /* fixes potential theme css conflict */ .acf-map img { max-width: inherit !important; } </style> <script src="https://maps.googleapis.com/maps/api/js?key=YOUR_API_KEY"></script> // GMapAPIのキーで書き換え <script type="text/javascript"> (function($) { /* * new_map * * This function will render a Google Map onto the selected jQuery element * * @type function * @date 8/11/2013 * @since 4.3.0 * * @param $el (jQuery element) * @return n/a */ function new_map( $el ) { // var var $markers = $el.find('.marker'); // vars var args = { zoom : 16, center : new google.maps.LatLng(0, 0), mapTypeId : google.maps.MapTypeId.ROADMAP }; // create map var map = new google.maps.Map( $el[0], args); // add a markers reference map.markers = []; // add markers $markers.each(function(){ add_marker( $(this), map ); }); // center map center_map( map ); // return return map; } /* * add_marker * * This function will add a marker to the selected Google Map * * @type function * @date 8/11/2013 * @since 4.3.0 * * @param $marker (jQuery element) * @param map (Google Map object) * @return n/a */ function add_marker( $marker, map ) { // var var latlng = new google.maps.LatLng( $marker.attr('data-lat'), $marker.attr('data-lng') ); // create marker var marker = new google.maps.Marker({ position : latlng, map : map }); // add to array map.markers.push( marker ); // if marker contains HTML, add it to an infoWindow if( $marker.html() ) { // create info window var infowindow = new google.maps.InfoWindow({ content : $marker.html() }); // show info window when marker is clicked google.maps.event.addListener(marker, 'click', function() { infowindow.open( map, marker ); }); } } /* * center_map * * This function will center the map, showing all markers attached to this map * * @type function * @date 8/11/2013 * @since 4.3.0 * * @param map (Google Map object) * @return n/a */ function center_map( map ) { // vars var bounds = new google.maps.LatLngBounds(); // loop through all markers and create bounds $.each( map.markers, function( i, marker ){ var latlng = new google.maps.LatLng( marker.position.lat(), marker.position.lng() ); bounds.extend( latlng ); }); // only 1 marker? if( map.markers.length == 1 ) { // set center of map map.setCenter( bounds.getCenter() ); map.setZoom( 16 ); } else { // fit to bounds map.fitBounds( bounds ); } } /* * document ready * * This function will render each map when the document is ready (page has loaded) * * @type function * @date 8/11/2013 * @since 5.0.0 * * @param n/a * @return n/a */ // global var var map = null; $(document).ready(function(){ $('.acf-map').each(function(){ // create map map = new_map( $(this) ); }); }); })(jQuery); </script> - 指定した場所のGoogleMapを投稿のコンテンツに挿入します(場所は好きなところで)
<?php $location = get_field('g_map'); // ACFのGoogleMapフィールド名 if( !empty($location) ): ?> <div class="acf-map"> <div class="marker" data-lat="<?php echo $location['lat']; ?>" data-lng="<?php echo $location['lng']; ?>"></div> </div> <?php endif; ?>
長所:頻繁使用に場所の指定が簡単。短所:テンプレートの変更が必要
- ACFでGoogleMapの利用は、各投稿/固定ページの編集時に、簡単にマップ上で場所指定ができます(頻繁の使用には有利)
- テンプレート変更が必要で、ソースコードの乱れがあります
- 投稿/固定ページのコンテンツに表示場所を変更するには面倒です
- 表示場所を変更すると、以前の記事/固定ページにも影響を与えます
